Q:

What about a NEW trigger assembly?

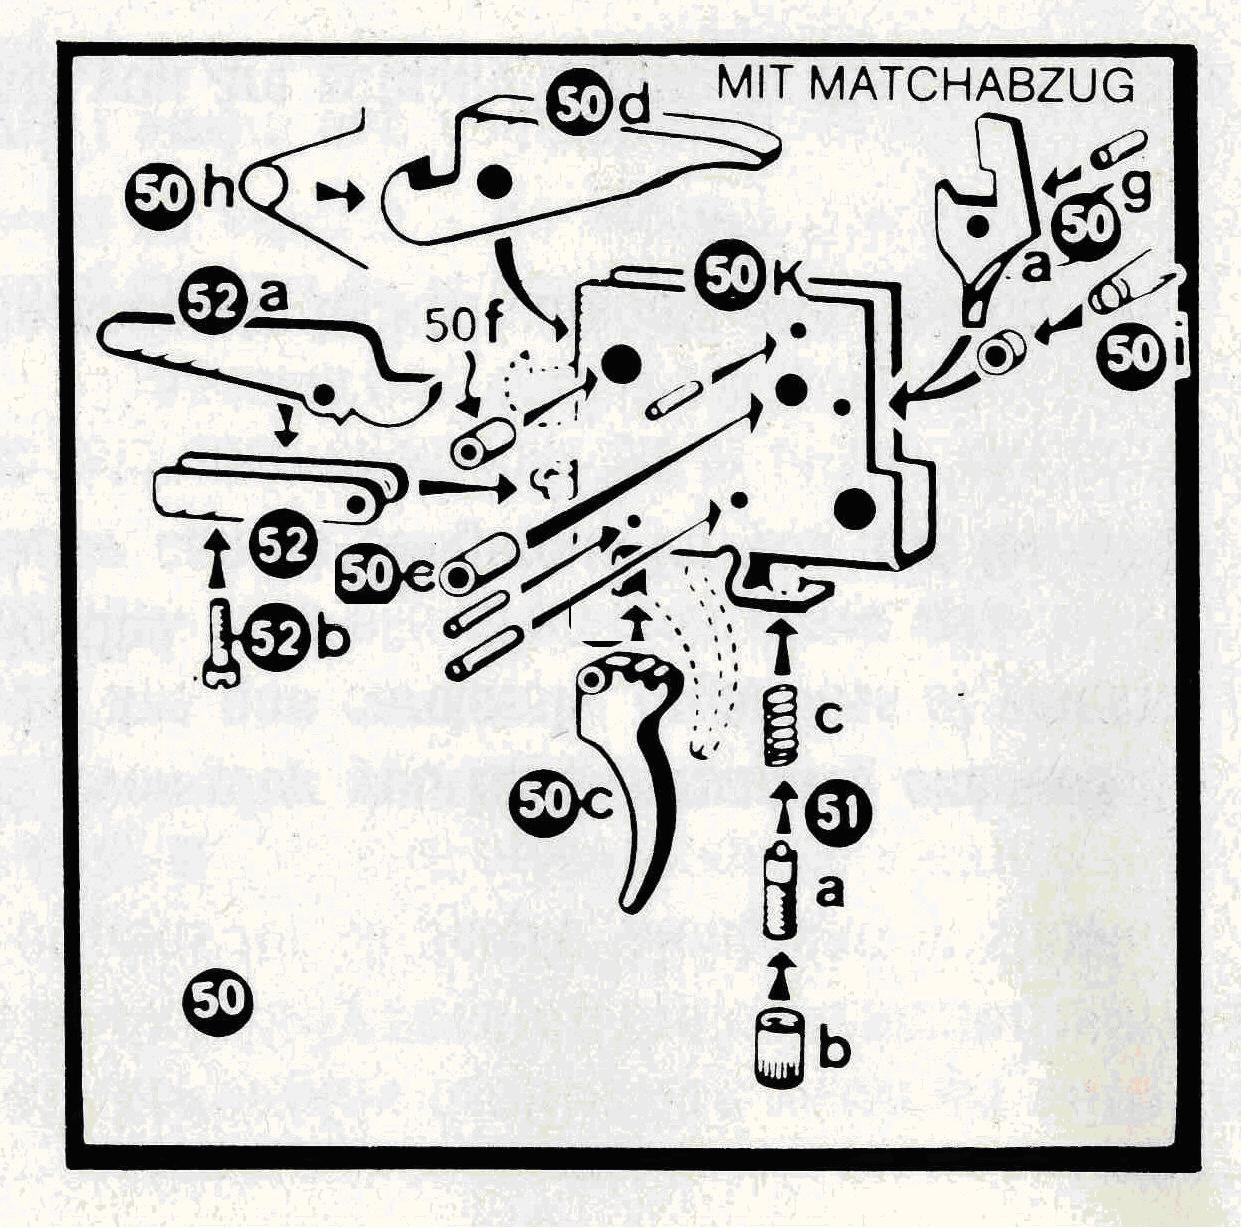
Every time I take the trigger guard off I grit my teeth about the trigger assembly. Too many small loose parts and too complicated, IMO, for a gun of this type.

With all the major skill and artisanship we have here, I’m wondering why no one has tackled the AF’s Rube Goldberg trigger assembly.

Yeah, there’s the trigger mod of course, but has anybody looked at the overall design of the trigger group and considered ways to make it simpler? The current three-piece design nested in all those little springs seems kinda over-engineered to this non-engineer. Fewer pieces make for a more elegant solution, yes?

What’s your thoughts? Room for improvement or good enough to not bother to mess with?

Mods/Machinists

All Replies

Viewing 7 replies - 1 through 7 (of 7 total)

I’d like to see a vid of your work. Plus 1 🙂

Looking to improve the factory trigger in some way.

quote Marc:

Well let me be the guy to dissagree. First start of with that they had to let the trigger work the other way around. So they had to design a complete new assembly. Furthermore there is little room in the “triggerhousing”. So a reverse low profile assembly.

Here’s a picture of my trigger parts.

The arrows show where I put the setscrews for adjustment.
I believe in the new assembly the middle sear is different so putting a screw at that point will be difficult. But from left to right the screws do this.
-Engagement
-1stage travel
-overtravel

First of I dropped the safety becouse that’s crap.
Then I shortened the piece of the hammer sear that actually holds the hammer and rounded it nice and smooth.(Don’t go overboard with this or yoy can trash that piece)
Then with the correct setting of the screws and a bit of tweaking with the spings.
Hammersear spring weaker(I used a fire lighter) and moving it forward to the slot and middle sear spring a bit more preloud (pulling it out a little). I get a very predictable trigger with a not to long a first stage travel and a nice pretty heavy hunting pressurepoint! I’m even camparing it with the anschutz 54 whe have at the gunclub. It’s that predictable. As in always breaks at the same point with the same trigger weight. En no 2nd stage travel. Just pull the trigger to the the pressurepoint. Then travel stops and it’s only a matter of increasing pressure slowly untill it breaks.

If you want I could try and make a small video.

I must admit that I have used the trigger parts that were made by a friend using a waterjet cutter. Material is O1(1.2510) hardened to 58HRc I think.

Regards,

Marc

I corrected the picture Marc and deleted the other post for you to clean it up.

I have thougt about an electrical solenoid operated version, but I havent had the time to put it into action.

Well let me be the guy to dissagree. First start of with that they had to let the trigger work the other way around. So they had to design a complete new assembly. Furthermore there is little room in the “triggerhousing”. So a reverse low profile assembly.

Here’s a picture of my trigger parts.

The arrows show where I put the setscrews for adjustment.
I believe in the new assembly the middle sear is different so putting a screw at that point will be difficult. But from left to right the screws do this.
-Engagement
-1stage travel
-overtravel

First of I dropped the safety becouse that’s crap.
Then I shortened the piece of the hammer sear that actually holds the hammer and rounded it nice and smooth.(Don’t go overboard with this or yoy can trash that piece)
Then with the correct setting of the screws and a bit of tweaking with the spings.
Hammersear spring weaker(I used a fire lighter) and moving it forward to the slot and middle sear spring a bit more preloud (pulling it out a little). I get a very predictable trigger with a not to long a first stage travel and a nice pretty heavy hunting pressurepoint! I’m even camparing it with the anschutz 54 whe have at the gunclub. It’s that predictable. As in always breaks at the same point with the same trigger weight. En no 2nd stage travel. Just pull the trigger to the the pressurepoint. Then travel stops and it’s only a matter of increasing pressure slowly untill it breaks.

If you want I could try and make a small video.

I must admit that I have used the trigger parts that were made by a friend using a waterjet cutter. Material is O1(1.2510) hardened to 58HRc I think.

Regards,

Marc

You and Me Both!

I second the motion whole heartedly… With wallet wide open!

…Rube Goldberg, good one. Oh, how I miss Saturday morning cartoons.

I agree that they could have done it better because the current un modified trigger sucks – certainly the worst PCP trigger I’ve used.

I disagree that its too complicated… 3 pieces with a few pins and springs is the definition of trigger simplicity. With the trigger modification its certainly workable and I’m quite pleased with it, enough not to want them to mess with it anymore because it obviously isn’t their strong point.

This is the alternative…

Viewing 7 replies - 1 through 7 (of 7 total)

  • You must be logged in to reply to this topic.