


Accurate shooting tips – UPDATED ON 2/11/2016
Hey Guys!
I posted this thread in the “General Chat” section but also want to post it here to help fellow newbie bullpup owners who are having issues with their gun. WARNING: THIS POST IS PRETTY LENGTHY!
If you are a seasoned marksman or one with a degree in airgunomics, feel free to click on the “back” button of your browser. Nevertheless, if you are a fledgling airgun shooter looking to read on and hopefully try some of the things I would like to share here to help in shooting more accurately before reselling your air rifle, or worse, using it as a crowbar, this post is specifically for you. Or, if you are excitedly waiting for your shiny new weapon of mass extinction (for you pest-heads) to arrive at your doorstep or are feeling frustrated because you just cannot seem to put the pellet where you want, stop thinking about the gun and relax a bit. This post is for you too.
Before going further, I want you to firmly establish this truth into your mindset first: the gun you have or will have is heck of a lot better than you! I don’t care who you claim to be, but it’s the cold, hard truth. If you think this isn’t possible because you happen to be a descendant of Annie Oakley or Bullseye Bill, they would probably feel insulted in gun nirvana right now because they know that it was purely their finely-developed skillset that made them sharpshooters. I personally believe that if your gun has a life of its own with the capacity to shoot by itself, it would humiliate you and thus make you feel unworthy to be a part of Ms. Oakley or Mr. Bill’s lineage.
I actually think that airguns do not need humans to demonstrate the precision they are truly capable of. I believe they are able to put pellets on top of another if they did it themselves in a gravity-less shooting range (if such a thing were to exist) where they are suspended and can operate on their own. That said, one of the key principles to extracting the most accuracy from an air rifle is the minimization of human input as much as possible.
Many times I read posts about a beginning shooter excited to have received his newly-arrived and expensive masterpiece only to be disappointed later because he could not get the accuracy he had read about in the forums, reports, magazines, et cetera. The problem is the individual himself with yet-to-be-developed marksmanship skills. Manufacturers of precision airguns should include a statement on the box and manual that states something like this: NOTE: THIS IS A PRECISION INSTRUMENT. ANY MISSES, BUYER-REMORSE, OR WOUNDED ANIMALS ARE THE RESULTS OF YOUR LACK OF SKILL AND EXPERIENCE! How would that make you feel?
I understand the frustration and disappointment people feel, though, when their gun isn’t doing what it is guaranteed to do because I experienced it myself before. I felt the guilt of having spent hard-earned, musk-scented, sweat-laden, and dirt-smeared dineros on an airgun I had initially thought was going to send not three, not two, but one pellet only to flick the off switch of a sparrow at fifty yards away or etch my initials on target-paper pellet after consecutive pellet. Because of this I kept it in storage for moths and spiders to call their high-tech home.
My shooting skills have improved greatly since then, and I can honestly say that I have a deeper understanding today of the factors that come into play when it comes to shooting accurately. I don’t have any military shooting background. Neither did I ever graduate in the summa cum laude class with a certification in bullseye-busting bad-assery. I attribute my present skills to a better understanding of the physics that govern a rifle from the moment of trigger pull to the end of the shot cycle. To go along with that, it was from lots and lots of practice and pellets. I don’t compete though… someday, maybe.
As a former educator, I can confidently say that the learning process, although often slow and bitter in the initial stages, always turns out to be very rewarding because it reaps pleasure and sweetness in the end. A problem always has a solution, but for disgruntled airgunners it is the road to discovering the solution that they don’t like to tread. They like to take shortcuts and spend more money to quickly get them where they want to be only to be even more frustrated and walk away from airgunning forever. Furthermore, with a precision tool designed to make a pellet repeatedly land on the point-of-aim, still, they usually end up questioning its accuracy when they don’t get it from the gun. They would then think that it should be as easy as writing a letter of the alphabet. After all, it is labeled as a “precision instrument” (If only they thought about how much and what it took for them to write the letter “A” when they were younger.). Shortly after, they tear into their gun, adjusting its valve, polishing a part here and there, changing spring rates, adjusting velocity, blaming the scope, and what have you (feel free to add onto the list).
I like to put things in perspective and to the test. I like to study mechanisms of personal interest and observe and gain insight of the dynamics that surround them in order to learn as much as I can so that I have a solid basis for their application or use in other applications. More importantly, just because I no longer teach does not mean I have lost the desire to share what I have learned. Conversely, I like to learn from sensible others also and the experiences they possess of the same subject matter. So if you have something to add to this or want to share your ideas, feel free to do so.
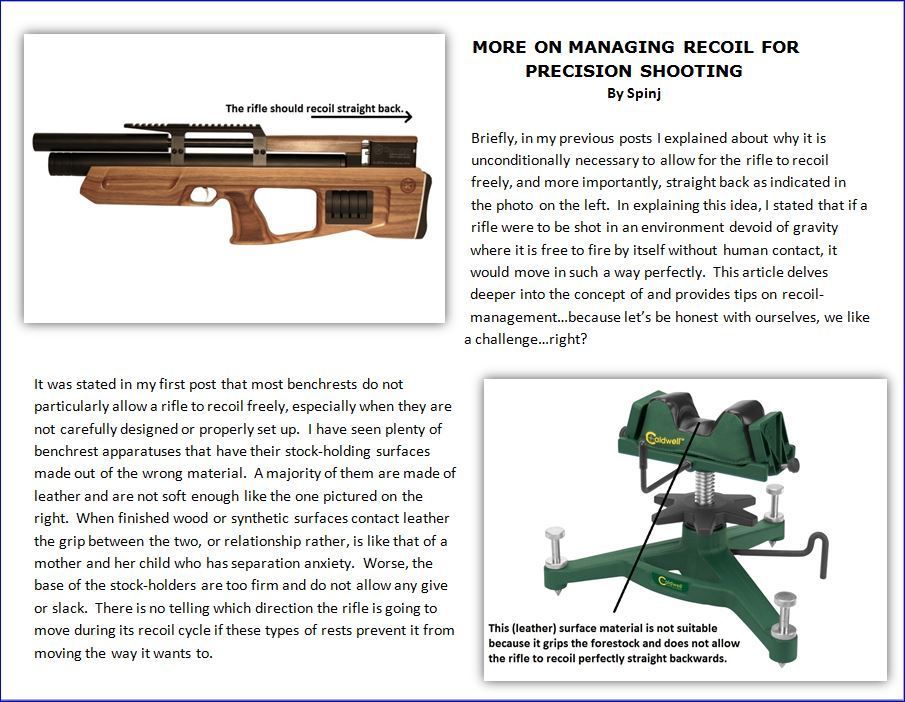
All right then, let’s get on with it, shall we? Firstly, in a response to a post by bullpup airgun tuner, Ernest Rowe, titled “Mutant Shorty Shot Count in 20 and 25 FPE” in the “Taipan Mutant” forum, I stated a little bit about managing an air rifle’s recoil. However, I did not give a detailed explanation on how to do so. So, this post reveals a bit more information that I was reluctant to provide in that response in the form of tips. The premise of this post is on recoil-management and on concentrating on how to effectively guide the pellet to its point-of-aim before pulling the trigger and thereafter. Note that I stated in the response that pre-charged pneumatic (PCPs) airguns also recoil and the reasons why with respect to Isaac Newton’s Third Law of Motion, so I feel I do not need to discuss that further here.
In keeping perspective of my background as a former educator, and for lack of a better analogy, launching a pellet to its intended impact point is akin to successfully preparing a child to go off on his or her own. You have to be patient and set a straight, forward, but focused path. In the interest of shooting, you have to take into consideration the external stimuli and their potential to derail the pellet’s intended flight path (similar to protecting a child from negative influences in his or her attempts at success). Factors like wind strength and its direction, instability of the shooting bench, the amount of coffee ingested, heartbeat rate, scope parallax, shooting position and posture, pellet weight and the influence it has on its trajectory, etc., will affect the direction of pellet travel. In this post, I assume you already know about these things. So keep this in mind when reading the tips below. Okay, I’ll end my blabbering here.
Tip 1: Get comfortable in your shooting position
When positioning yourself to line up a shot, it is important not to feel like you are forcing the rifle to the point-of-aim. Ignore this first tip and you can forget about proceeding any further. I can guarantee that if you take a shot while not considering this crucial step your pellet is going to land somewhere else other than your point-of-aim (If you do actually hit what you were aiming at, consider it luck.). The sensation you should get is one in which you feel planted and stationary and that the rifle is steady. Make every effort to ensure that the rifle is not being torqued into its aim point, nor is your hand on the forearm and pistol grip applying any lateral pressure. You should feel relaxed and unrestrained. At the same time, you should have very minimal contact with the rifle. Cheek pressure should be to the extent that your cheek is only “kissing” the cheek-piece of the stock.
Tip 2: Find the rifle’s natural point-of-aim
Once you have come to a comfortable shooting position, it is time to find your rifle’s natural point-of-aim (NPA). This is very critical in establishing a steady sight picture. NPA occurs when the scope’s reticle does not move from its aim point even when you temporarily fix your gaze on something else (without moving your head) instead of the crosshairs and aim point for several seconds and finding that the crosshairs remain fixed to the aim point when you return to view them. When you have arrived at this juncture, you will discover that your muscles are not exerting any tension and applying pressure on the rifle at all, which is what you are after. As stated earlier, the key is minimal contact with the rifle.
Tip 3: Pay careful attention to the crosshairs and target
Because you do not have superhuman vision, you cannot detect even the tiniest movement of the rifle’s barrel from the aim point. After all, it’s the barrel that should be the reference point and tell you if you have deviated from its set position. Fortunately for you, you have your scope to aid you in your efforts to maintain a steady aim and correct sight picture. The scope should project a clear, crisp sight picture whereby the reticle is sharp and the target is clearly focused. This is important as having a clear image will help to eliminate parallax error (a phenomena in which the target appears to move away from the reticle when you move your head vertically and or laterally). More importantly, the crosshairs should not be drifting away from the point-of-aim; they should remain still for about fifteen seconds or longer.
Tip 4: Practice trigger control
Practice trigger control in the middle of taking a shot, you ask? Absolutely! I did mention about being patient earlier didn’t I? Don’t be too trigger-happy and rush the shot. This is one of the most critical steps to precision shooting. When I say practice trigger control before taking the shot, it is for two reasons (This is one of a few secrets of my shooting technique). The first one is to confirm that you have followed the first three tips above correctly. The second reason is to prepare for the straight launch of the pellet. So now you’re probably wondering how on Earth trigger-control can be practiced when the gun is cocked and loaded. This is what I do. I like to use the back part of the trigger – the curved wall directly behind it – and pretend that it is actually a trigger that is at its second stage. I would pull that part and pay attention to the reticle and see if it moves. If the crosshairs move away from the target sideways, up, or down, I go back to doing what is mentioned in tips 1 to 3. Most of the time, it’s just a matter of adjusting my hand on the pistol grip, my elbows, or releasing pressure on the cheek-piece. Sometimes I make all these adjustments.
I cannot emphasize this enough: THE CROSSHAIRS MUST ABSOLUTELY NOT MOVE UP, DOWN, LEFT, OR RIGHT WHEN TESTING TRIGGER PULL! Make the necessary adjustments to ensure that this does not occur. Remember this: Any unwanted movement is going to be magnified when the shot breaks. If the crosshairs do stay stationary when pressing on the area behind the trigger, then proceed to the next tip.
Tip 5: Slowly and smoothly pull the trigger
This is what I think is the most important step to accurate shooting. All the things you did in tips 1 to 4 are riding on careful pulling of the trigger. As practiced in tip 4, apply the same manner-of-pull slowly and smoothly while keeping an eye on the crosshairs’ movement in relation to the point-of-aim. If you detect even a slight horizontal or vertical movement of the crosshairs, let go of the trigger and try again. Of course, you need to make sure that when pulling the trigger you are also applying correct breathing technique. I like to inhale fully, let out half of my breath, pause then smoothly pull the trigger in between heartbeats or pulses until the shot breaks.
Tip 6: Freeze!
When the rifle has fired you are not done. Do not even bring your trigger finger forward! This is a common mistake many shooters make. Leave your trigger position where it was when the shot broke. Additionally, your body position must continue to remain the way it was prior to the shot. This must all be done until the pellet hits AND until the rifle has stopped moving completely. And don’t take your eye off the crosshairs. Pay attention to its movement during the shot all the way to the stop. This is essentially what is called follow-through.
As per Sir Isaac Newton’s Third Law of Motion, every action has an equal, opposite reaction. Simply stated, the rifle will impart movement that is the reverse movement made by the discharged pellet. Your job is to keep that movement of the rifle straight backwards – the preferred type of recoil movement. If everything has been done perfectly the reticle should appear to remain steady, but the gun has actually moved as per Newton’s law. This is an indication that the rifle has recoiled straight back and is exactly what you want it to do. It is difficult to see (or not see, rather), but you should be able to feel it. Sometimes, the reticle will move vertically upwards. This movement is also a good indication that all the steps have correctly been executed (remember Newton’s law).
The information mentioned in these tips is what I have used to develop a technique that has allowed me to extract as much accuracy as I can from my air rifles. Utilizing this technique has also enabled me to call my shots; before a shot breaks I can almost predict where the pellet is going to land, and if it hits an unintended part of the target I know that it was my fault and not my gun. When doing all the steps become second nature you can almost feel the shot even when shooting in the wind. You also become more competent in applying holdover and hold-under in a variety of distances when shooting. It’s a wonderful feeling, and it took me a number of years to develop. I am sure that with much quality practice time, you too can develop this feeling. It is what inspires confidence in shooting. And I believe it is that confidence that makes shooting more enjoyable.
Shoot safe and have fun guys!
– Spinj
All Replies


- You must be logged in to reply to this topic.
It’s like I said in several of my posts, I shoot/train a lot. This morning, I decided it was time to extract all the pellets from my current pellet-trap box; it is just one of the many pellet traps I’ve gotten rid of in the past. Below are photos that shows just a few that I’ve managed to remove, and I’m only halfway done. When I’ve removed as much as I can I plan to sell them to my local scrap metal recycling center just so that I can get a little bit of my money back to buy more pellets. I’m not kidding when I say that I buy pellets by the bulk and that they are more important than buying airguns to me. I’ve spent much more on ammo than on airguns. 😀