


Newbie safety removal question
I’ve read the posts and stickies about removing the safety. Which part numbers are completely removed? #1, #2, #3, #4, and #7?
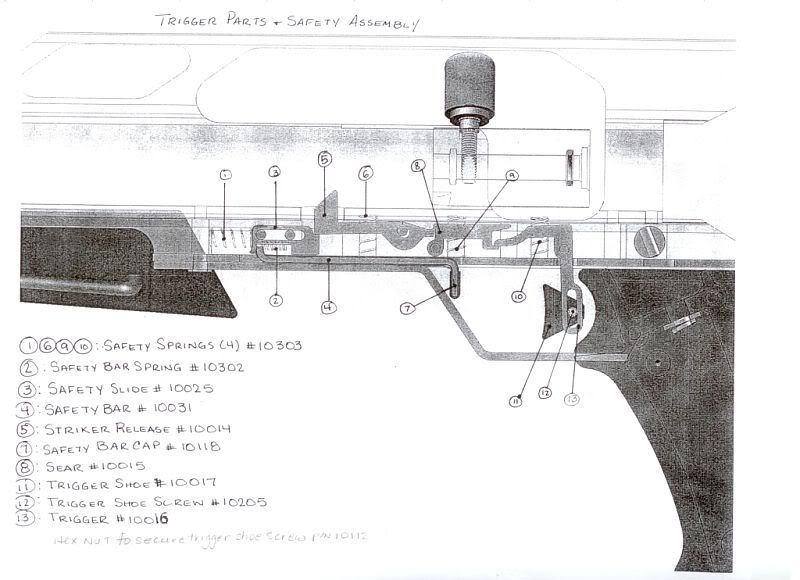 [/quote]
All Replies
Viewing 10 replies - 1 through 10 (of 10 total)
FYI….as I am here fiddling with the safety and grip, my motion sensor has gone off twice. It’s Mr. Possum at the bait station. He gets a pass tonight.
Again, thanks guys for the advice.
I put one of the safety springs in the location right under the hammer release. I stretched it a little bit too. I also put part number 1 (safety spring that was removed) and placed it at the number 6 location. Maybe this would give more load to the hammer release.
This does help to cock it. But, I it doesn’t always catch. What I have to do is cock the knob, hold the knob and give the rifle a jiggle to get that part number 5 (striker release) to catch hold.
Not sure how long this will last. Or if this is safe to do.
But, now I encountered another challenge. When I put on the grip securely, I can’t pull the trigger. Only if I really loosen the screw that hold the grip to the frame, then I can pull the trigger and fire. But, then grip is really wobbly. What now?

It will give more of a load to to the hammer release and should cock easily.
Tony
Tony not to question people who know more than I.
I wondered about that position but thought the spring might wander around in that location. I was toying with somehow making a projection where the spring would have a bump to sit over thus locating it.
Had the same problem. Besides what Dyotat100 said.
Check all the springs for length. Put the longest one in #6. Maybe stretch it just a tiny bit. #6 is the one that pushes #5 into the locked position. Notice #5, where the pin goes through it’s an oval. When the #1 spring is removed there isn’t the rearward push of the #3 spring to push #5 back into #8, so it doesn’t catch as easily.
Another thing that I found is the plastic rings that guide the hammer. The rear one gets damaged by the metal being deformed at the very top of the housing where the breach knob shaft slides forward into it. They put a ring on the shaft to let it roll, but the ring is harder then the housing and when it doesn’t cock and hold, I would push the breech forward again and harder thus deforming it faster.
I put a sleeve of electrical shrink wrap tubing on the sleeve to slow the wear and cushion.
If it doesn’t fit, force it. If it breaks, it needed replacing anyway!
I’ve been wrong before, I’ll be wrong again.
P.S. a barrel guided hammer I think would help in this case. Wonder where someone/I could get one? 😉

Take #6 spring and move it to location 4 right under the hammer release…
It will give more of a load to to the hammer release and should cock easily.
Tony
Ouch. I think that’s going to beyond my simpleton capabilities.
Could it be that the springs may have been stretched and lost their strength (and are unable to push that striker release knob thingie upwards to keep the hammer in cocked position)?

You probably need to make the notch on 8 deeper where 5 locks into it.
Thank you.
I removed the parts put everything back together. But, when I try to cock the rifle, it won’t stay in cocked position. What newbie error did I do?
1-4 and put the 2 pins back in to fill the holes
Viewing 10 replies - 1 through 10 (of 10 total)
- You must be logged in to reply to this topic.
Update….
I removed the additional spring from position 6 and kept the spring at position 4 (directly under the striker release). Then I played with the tension or high tight I screwed in the grip screw and the triggerguard screw. Others have mentioned that if the screws are in too tight, the overall effect is that the trigger doesn’t have enough force to over come the springs to release the striker release. Of course they were right.
Things seem to be working now.
This forum and members are awesome. I’d be lost without you guys (and maybe gals too). Thanks.