Q:

Vulcan with "Scopeless" Near IR Night Vision Project

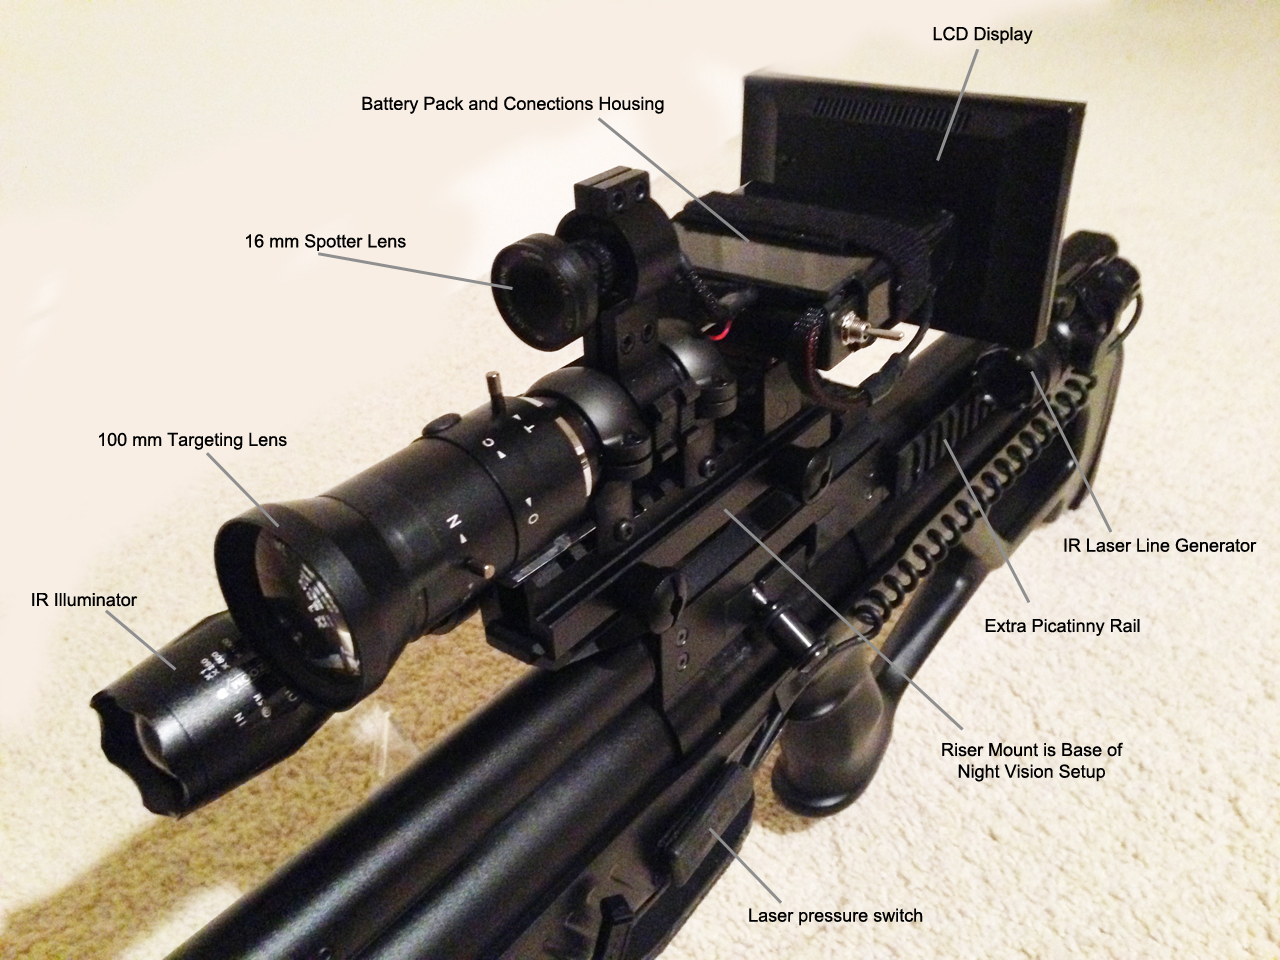
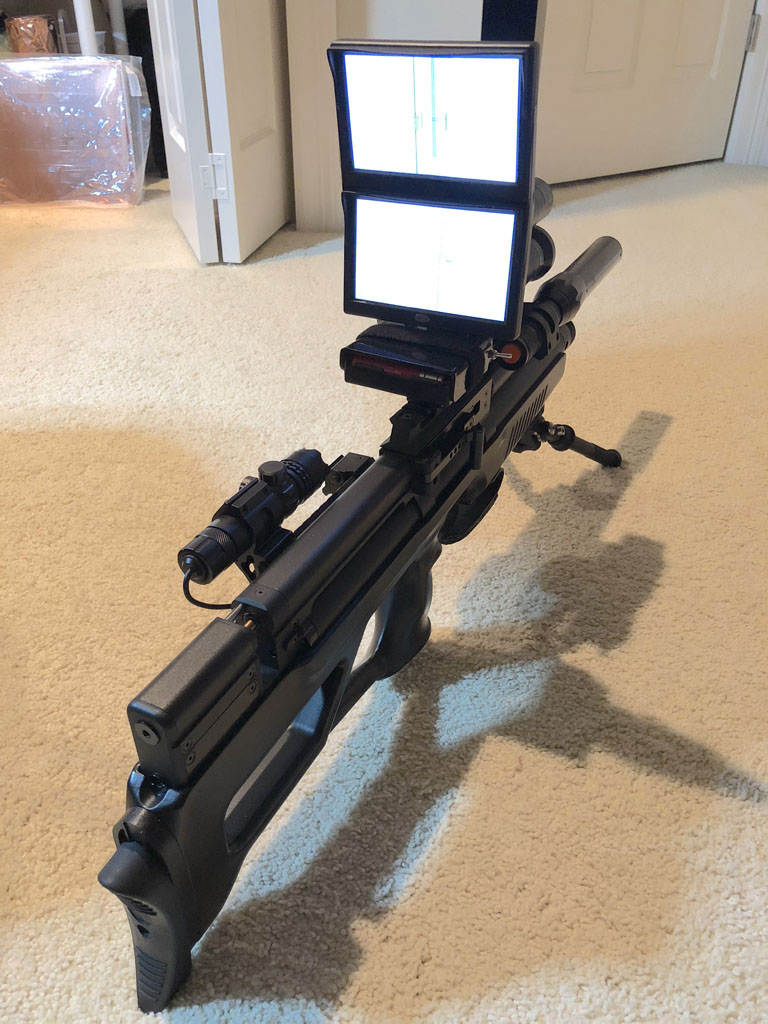
Here is the Vulcan dressed in a new black stock and ready for use in the dark. Largely followed the Rolaids “scopeless” build, but put mine on a low riser instead of directly on the Vulcan’s rail. This lets me easily swap between my optical scope and night vision setup. For the distances I shoot at (<50 yards), zero holds just fine when I swap scopes. This scopeless setup also works during daylight if I close the lens iris. It’s not for field target nor dragging through the woods, but it does its intended job well.

With the camera lens zoomed out (and locked) at 100 mm, I get the equivalent to about 7-8 power magnification when viewing from normal cheek weld. Field of view at 50 yards is abut 2 1/4 feet. One flip of a switch and I can switch between wide angle spotter and targeting cameras.

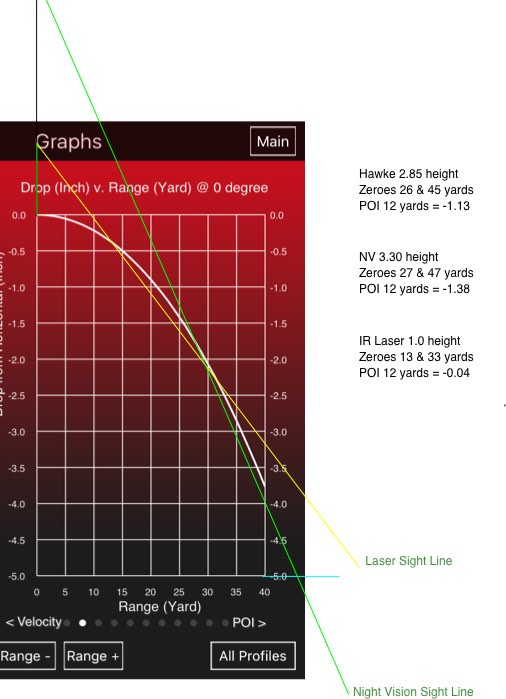
The laser line generator projects an invisible, horizontal line. It is a 5 mw IR laser into which I installed a line generator lens. The line generator lens also disperses the IR so it is less hazardous. You don’t ever want a pin point, nearly invisible 850 nm IR laser shining into your eye. You’ll burn your retina even at low energies because you won’t blink. Short bursts + line generator dispersion helps keep things eye safe. Still, I wouldn’t go staring into an IR laser or point at specular reflectors. I have the generator mounted 1″ above the barrel. This lets me use it as in instant rangefinder and holdover solution. Zeroed it vertically for 13 & 33 yards. As you sweep the scope farther/closer in distance, the horizontal laser line appears on the display screen. Its intersection with the vertical reticle line indicates the proper holdover for 1/2″ sized targets from 9 yards out to 37 yards. One brief press of the laser button and I instantly range and get proper holdover for those ranges. Actually, anything between 27 and 45 yards, I can simply aim dead center of the cross hairs.

I tried an add-on NV setup behind my Hawke, but that was too heavy and performed far worse in terms of light gathering. Scopeless built upon a removable riser rail gives me the best of both worlds.

Because there isn’t room on the Vulcan’s rail, I added an accessor rail on the left side of the action. That holds the IR laser line generator and will eventually have a zero conformation laser. That will be a tiny unit used to check zeroes are holding when scopes are swapped.


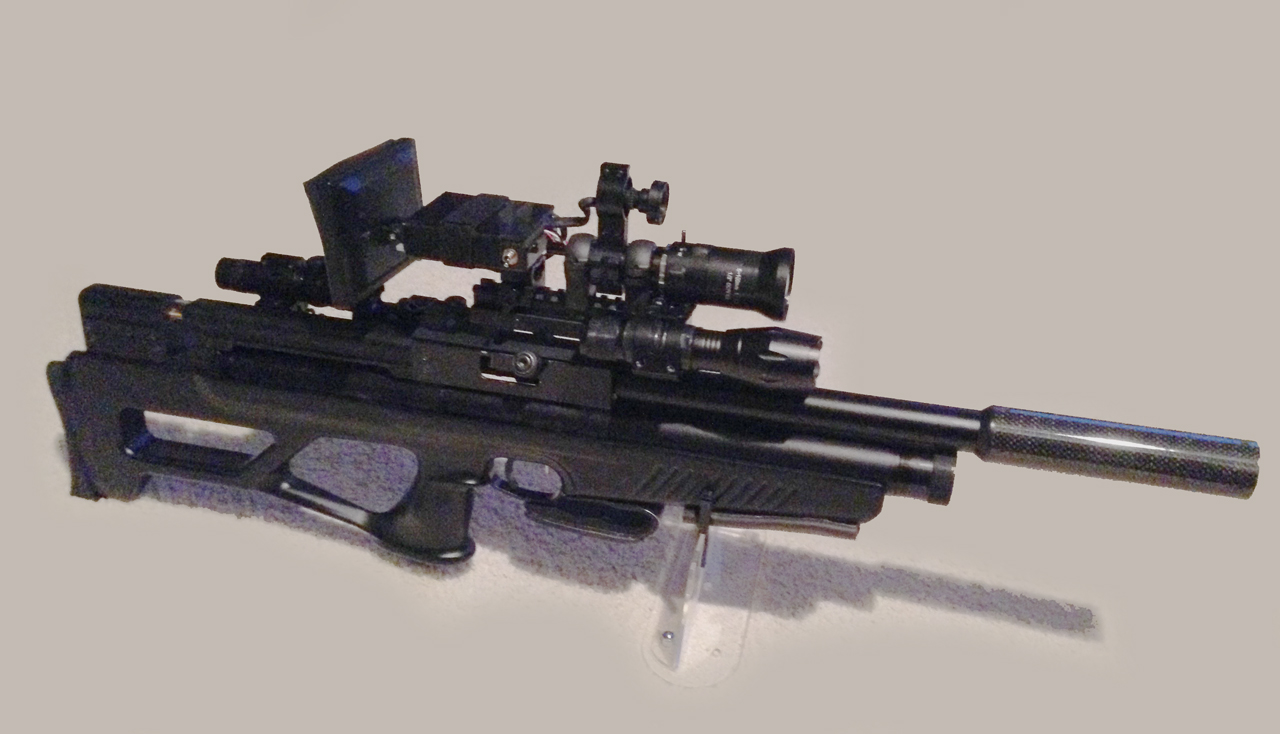
Right side of completed setup

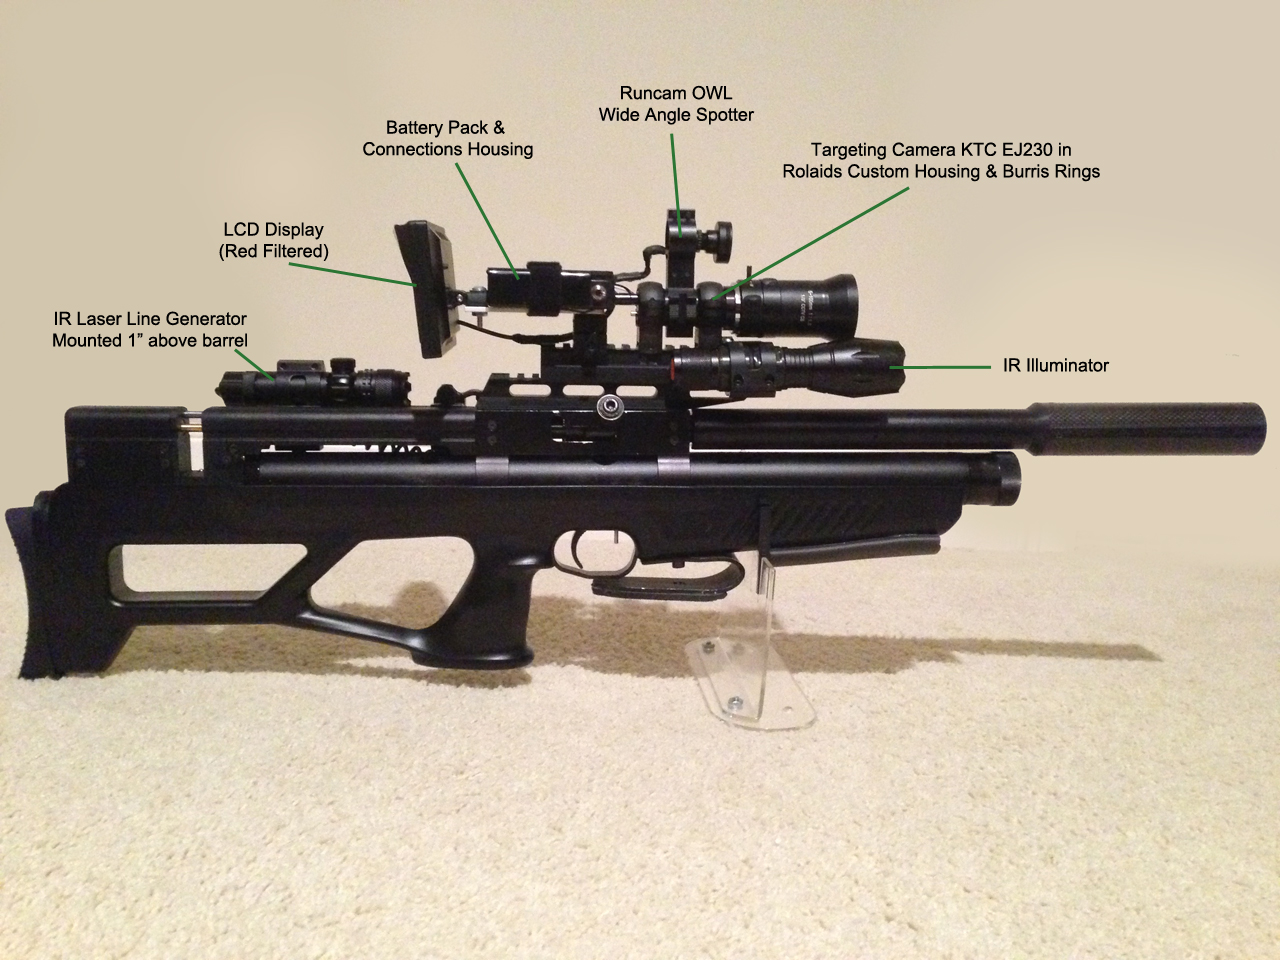
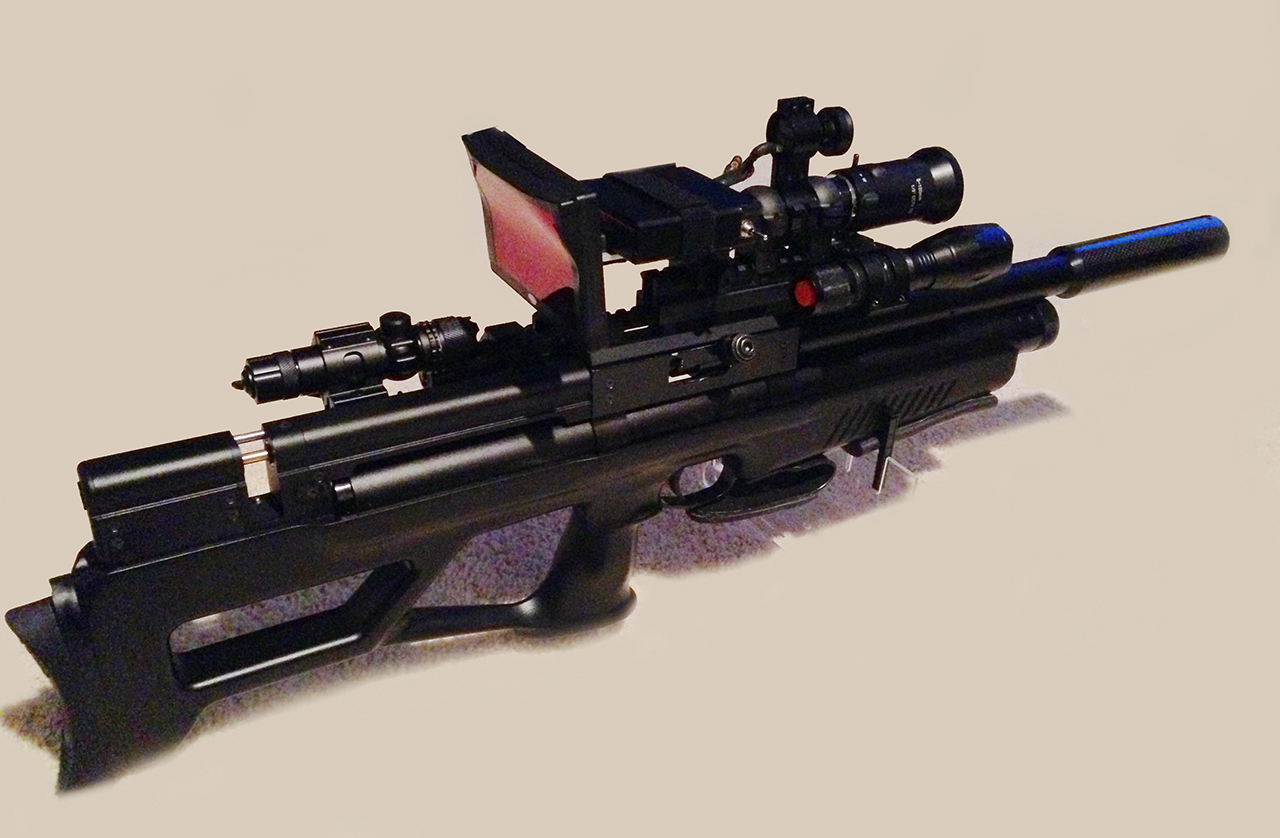
Left view showing additional Picatinny rail & laser line generator.

Optics/Nightvision

All Replies

Viewing 15 replies - 1 through 15 (of 17 total)

1 2

Finally, got the trajectory graphs recovered from Photobucket. Makes it easier to understand how the IR laser indicates holdover for closer than 25 yards.

I haven’t actually used my Hawke optical scope in nearly a year now. I originally intended to swap scopes for day/night. Building on a riser rail actually does allow quite good zero retention when swapping between scopes. However, I’ve found it a lot more convenient to simply use the night setup during daylight.

thanx

Sorry, the Photobucket debacle clobbered some images permanently.
I have managed to recover some and host without Photobucket

Current build has two screens for simultaneous viewing of targeting and spotter cameras.

OWL camera was replaced with a 2nd EJ230. That allows crosshairs in both spotter and targeting views.

Also, the IR laser for indicating holdover has been very effective. I simply tap the laser button and where the laser appears on the screen indicates my needed holdover for things < 25 yards. From 25 to 40 yards, I can just aim center cross hairs and hit the quarry. It’s really in the closer ranges that the laser makes things easy and fast. Ranges and indicates required holdover in a fraction of a section.

how can i open the pictures?

Chairgun and a graphics layout program were helpful in deciding how high to mount the laser. Here, I am laying out the sight lines vs the pellet trajectory.

O.5 inches height above the barrel for the laser would make it more dead on POI for closer ranges, but I wanted the effective strike zone to go out a bit further. I compromised at 1.0 inches above the barrel. I lose about 1 yard up close, but the kill zone alignment for the laser goes out to about 30 yards.

Another way of looking at it is POI vs range. Here are my laser and scope graphs combined together. Together they give a nice firing solution for a 1/2 target zone for my desired pellet gun range.

Closer than 25 yards, use the laser to designate holdover. Between 25 and 50 yards, I can simply hold dead center. Can’t get much easier than that. No holdovers to remember. Just flash the laser line and shoot using the intersection for close range. Dead on cross hairs for everything else.

For indoor calibration at 12 yards, I used the POI at 12 inch data of all three “scopes” to build myself a target. With careful attention, adjusting all three (Hawke, Night Vision, Laser) at 12 yards keeps all three on target at 45 yards. It was a fun couple weeks getting al the real life measurements and calculations to line up.

Sorry, this target is ONLY valid for my particular gun, scope mounting heights, and pellet trajectory. You would need to do the ballistics in Chairgun, verify the results at range. to finally get the equivalent 12 yard POI’s correct. That “tree” reticle on the target has bunny head width lines. This lets me check that my reticle is correctly set up. When all is well, all the lines exactly superimpose on screen with the reticle.

The 10 MilRad detail was needed to set my Hawke’s zoom to exact calibrated power.

Here are some masses.

Night Vision Rig: 2.4 lbs
Hawke Sidewinder Airmax 30 8-32×50: 2.2 lbs
Vulcan synthetic + Night Vision Rig = 11.6 lbs

The NV is just a tiny bit heaving that the big Airmax. Neither are light.

BTW, I calibrated the optical zoom range of the Hawke and found it actually runs from 7.7 to 25, not anywhere near as spec.
Had to put my own calibration strip on the zoom ring to indicate true zoom relative to MilDot.

Thanks for the recommendation on a DVR. I was looking for one, but never could decide on which.

My build evolved over a couple weeks. Each revision got it better customized to match my niggles. For instance, the LCD ended up at that height and distance so I can peer over my glasses and view the screen at that range. I’m near sighted and it is set to my focal point. Still keeps my glasses between me and the breach, but the screen in focus while in cheek weld. Pivots up for those instances of shooting under a low obstruction.

Had to chop up an offset mount to get the light positioned where I wanted it. A normal offset mount would hold the light up above the rail. I wanted it down lower.

The biggest build was finally getting myself a PA-09 crimper and some connector sets. I can finally crimp and make my own little interconnects. Keeps things nice and neat. Also, silicone wire is the way to go. It is much more flexible and you can really cram it into nooks.

My favorite feature is the IR laser line ranging and hold-off function. I don’t judge distances that well in the dark. Now, one press of the pressure button and I get instant holdover solution right on the LCD display.

A standard build would have been cheaper without the redundant materials, but nowhere near as fun to experiment with.

Well what attracted me to your build, is that is not the norm, just not normal 🙂
The light, the screen..just a little different. (I like your screen and how it mounts better)

Its a little bit different than a standard build, its just little off. This is a very good thing, it shows very inventive thinking your not just going with the status quo, instead your inventing as you go.

Well done sir!

Consider adding one of these to your next build..they work fairly well.
http://www.ebay.com/itm/201733288971?_trksid=p2057872.m2749.l2649&ssPageName=STRK%3AMEBIDX%3AIT

I only need 50 yards range and much of the area is already flooded with IR from surveillance cameras. The “not so good” lens is already doing a great job for me. I wonder what a good lens would be like. Already, a 1/2 inch target at 40 yards is easy with the NV rig.

Yes, I know about those three little screws holding the silver ring. It is amazing they manage to keep the lens steady. Definitely wouldn’t want to bump the lens.

The IR illuminator is just https://www.amazon.com/gp/product/B01EX46D72/ref=oh_aui_detailpage_o07_s01?ie=UTF8&psc=1
It is fine for the ranges I’m covering. Heck, I practically don’t need an illuminator with all the surveillance camera IR that is already lighting up the place.

quote guykuo:

Ahh… DSA. That makes sense now. The OWL would probably be fine for that. Just look out for the OWL PLUS which is IR filtered.

Sorry to hear about your POI problems with a scopeless. I’ve been very impressed by how well my POI is holding steady despite swapping between my Hawke and NV setups repeatedly. I must have gotten lucking getting the NV rigid and the lens isn’t shifting stuff badly internally. I locked the zoom, of course, but left iris sand focus free to move. POI stays same with focusing. The lens took ages to arrive from China, but was $65

https://www.amazon.com/gp/product/B01EW7ZL6Y/ref=oh_aui_detailpage_o04_s00?ie=UTF8&psc=1

Yes, I’m familiar with that lens, I have 2 of them. The NV forum guys will tell you it’s not a very good lens. But for an Airgun and out to 150 yards..its just fine. I’m going out of memory, so this may be just a little off, but I’ll throw it out there. Where the lens screws into the camera, the CS mount. The silver band of metal..close to this there are 3 little screws(maybe allen), mine came loose. Be a good idea to take a look tighten and add few drops of locktite if needed. This caused me a bit of problems

What light is that? its not T20/T50

Ahh… DSA. That makes sense now. The OWL would probably be fine for that. Just look out for the OWL PLUS which is IR filtered.

Sorry to hear about your POI problems with a scopeless. I’ve been very impressed by how well my POI is holding steady despite swapping between my Hawke and NV setups repeatedly. I must have gotten lucking getting the NV rigid and the lens isn’t shifting stuff badly internally. I locked the zoom, of course, but left iris sand focus free to move. POI stays same with focusing. The lens took ages to arrive from China, but was $65

quote guykuo:

The Runcam OWL isn’t well suited as the main camera. It completely lacks any adjustments for image quality and cannot generate an electronic reticle. The EJ230 can generate a reticle and you can much more easily create a mechanically rigid mounting with its form factor. The OWL could be used if you also obtained an external reticle generator board and found a way to very rigidly support your lens. The lens would then have to hold the OWL via an adapter. The custom housing for the EJ230 that is available from Rolaids Night Vision is wonderfully rigid a mount for the camera and lens and fits 1 inch rings perfectly. It’s a bit pricey, but you get reliable POA stability.

I was more interested as its use for DSA systems. I have done a couple scopeless builds but was never happy with them, problems with POI.
For me its DSA, just easier and work well with the E700 (230 board version). out to a few hundred yards..plenty.
But the 700 or 230 are around 100 bucks, the owl 40-50 I think. I have played with more cameras than you can shake a stick at, but never with the OWL. Effio-e”s, Effio V’s..and a few cmos units..they all get blown away by the 700 or 230.

Anyways, nice build and you should post over in the NV.UK forums if you have not already.

The Runcam OWL isn’t well suited as the main camera. It completely lacks any adjustments for image quality and cannot generate an electronic reticle. The EJ230 can generate a reticle and you can much more easily create a mechanically rigid mounting with its form factor. The OWL could be used if you also obtained an external reticle generator board and found a way to very rigidly support your lens. The lens would then have to hold the OWL via an adapter. The custom housing for the EJ230 that is available from Rolaids Night Vision is wonderfully rigid a mount for the camera and lens and fits 1 inch rings perfectly. It’s a bit pricey, but you get reliable POA stability.

That’s a pretty cool build! You did a good job on this..

I have never seen anyone else just mount a 2nd camera (the Owl) right on the main unit. Good idea
I have only seen 2 or 3 people use a laser in this method for range finding. Some serious thinking going on, your good!

Since you have that Owl and a 230, how would you think the Owl would compare to the EJ as the MAIN camera?

Damn, that NV stuff is a helluva project for sure, but I suppose weight might not be a huge problem because you can’t move around too much anyways right, you’ll spook your prey. (I know nothing of NV hunting 😛 )

Viewing 15 replies - 1 through 15 (of 17 total)

1 2
  • You must be logged in to reply to this topic.