


Operation six-milly.
The first part of the new valve has been successfully completed. This is going to offer a 6mm air-flow and will retain the stock valve-body. Kewl, huh? 😆
All Replies
I believe if the valve is kept open too long the heat-transfer from prolonged expansion of the compressed air across the seal edges forms ice-crystals, which stop the valve from closing. I think I read that on Leupy’s site.
It’s just occured to me that this is a back-to-front vacuum.
There has been much discussion on tank dumps. I think the biggest reason for a tank dump is when you have to go to a larger spring and hammer to compensate for a larger valve. That extra spring weight is pushing on the valve and keeping it from closing. The second reason is what you just said, trying to push all that air through that small hole creates back pressure and does the same thing. It keeps just enough pressure in front of the valve to keep it from closing all the way. Look at all the trouble Condors have with just a high flow valve. It is a fine balance to get the larger valves to work correctly.
When you do be prepared for a tank dump if shooting a .177 or .22 cal
Have fun and be safe 🙂
Walter….
Why a tank-dump at those cals, because the air-bore is bigger than the barrel-bore?
Force holding your valve closed occurs at the ‘seal’ diameter so in this case 8mm so you will need a good hammer weight and stiffer hammer spring to pop that open. not the port diameter that you mention.
When you do be prepared for a tank dump if shooting a .177 or .22 cal
Have fun and be safe 🙂
Walter….
Cheers
I wasn’t saying it wouldn’t be an issue at all, it was more about how much of one, which was where my expectations were wrong. Having crunched the numbers I can now see why.
If you take a Blodnob valve and assume a seal with a diameter of 7.5mm you get an area of 44mm. On my mate’s rifle he gets 900+-FPS with 31grain .25 rounds at 2400PSI. 100g hammer.
On my test I saw 750FPS with a seal at 12mm diameter, 105mm area at 1000PSI. 21grain round. At 2000PSI I got 350FPS. 50g hammer.
So clearly surface area has a significant effect, more of one than I anticipated.
The new seal is done. It has a dia of 9.50mm, giving a surface area of 70mm. I don’t think I’ll get it down from that, the seal is going onto an 8mm dia thread so it’s cut pretty fine already (0.75mm wall thickness on the seal). I’m guessing there’s some kind of exponential shizzle going on though, so hopefully I’ll see a marked improvement by losing 35mm of surface area.
Thanks for your input Marc. 🙂
I hate to tell you……….But told you so 😆
Cheers
Does it work!
Cheers!
It does work, after a fashion. We tested it on a friend’s FAC rifle and got 750fps at 1000psi but only 350fps at 2000psi. There were two possible causes, either a component-jam or the pressure holding the valve shut. Turns out it was bottle pressure. But not so suprising, the nylon seal was massively over-engineered and has a surface-area of 105mm. 😯 😆
Other prototype issues include the main stem being aluminium instead of SS. Two SS stems failed while being tweaked, then I bust the tip on my parting-off tool. No more SS until I get a new one. But the alu has worked well in the interim.
The inlet-ports were 50% occluded by the seal, but as there are three of those at 4mm each it wasn’t a major disaster.
The seal is going to be significantly reduced in size, down to an active surface-area of 50mm. One part will be made a tad longer, to clear the inlet-ports. Test-fire again and see what numbers we get, then increase hammer-weight from the current 50g he has in his rifle if the numbers are still too low.
There’s a fair bit of friction throughout the assembly, most of the tolerances are a bit too close (over-precision analness 😆 ), but of minor importance. Bit like an early M16 vs the AK47.
Is summary, it works but needs tweaking to make it do so at 100% effectiveness. I’m pretty pleased so far, if only for the fact it didn’t piss air all over the place. 😀
I’ll be back. 😉
I guess Lang blew himself up! 😯
Does it work!
Cheers!
Cheers
Cheers Marc. 🙂
Ok, we’re talking of a difference between a 3mm bore vs a 6mm bore. If we ignore the nylon seal and go with just the area of the bore, for the sake of simplification, we get:
3mm bore = 7.065mm area
6mm bore = 28.26mm area
Four times as much area.
I don’t know about anyone else, but I have no idea how much force is required to get 7.065mm to punch into 3000psi. But from my own experience so far with stock vs modified bore sizes I suspect there’s considerably more force available from a stock setup than is actually required. So people tinker with hammer-weights and springs to vary duration. I guess one could also mess with the inlet-ports on the stem to some effect.
I could go with a huge hammer-weight right off the bat, but maybe then I’d get max power plus a bunch of wasted air. Then I’d have to work backwards. I think it’s more sensible to go from a lower hammer-weight and work forwards.
Anyhoo…
I have to make a new retainer-cap, the current one is a couple of mm too short and pre-loads the return-spring too much. No biggie, I assumed I’d have to re-work some parameters until everything matches up sweetly. The stem has been a PITA, I went with SS and I ran the first length too fast and the piece flexed, resulting in a rough cut. I went slower on the other end and it cut nicely. Boring it out went smoothly too. Everything assembles nicely and it all moves as it should, although too stiff with that preload on the spring.
So, the latest image from The Gonzo Workshop 😆

Givin the size of your valve it’s not a case of experimenting with hammer weight later. But rather the first thing you do to even open that thing at 200 bar!
Cheers
Make the valveparts from as tough a material that you can machine. If your not to enthousiastic with revs and feeds you can easily machine toolsteels with HSS. I often use bolts in 12.9 quality. Those are tough.
Machine yourself a small tank thingy with a small volume that you can hook up to your valvebody. If you start messing with valves in the bottle you’ll be traveling to the diveshop a lot. That configuration saves plenty of air!
Cheers
Noriko wants a word… 😯 😛
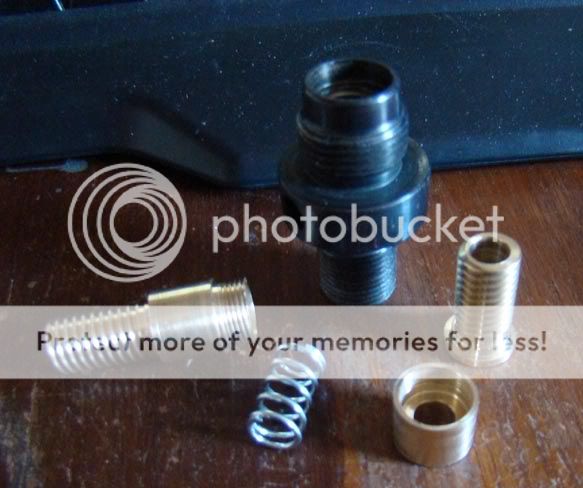
All the brass is done. I’m still waiting for the mild-steel rod to be delivered, though I do have some SS, of which I’m a bit leery. The thought of trying to drill a 6mm bore up 60 or 70mm length of that stuff fills me with some trepidation.
Anyway, pretty picture time…
Get your 6 year old boy to test fire it, don’t wanna hurt yourself. Gotta think health & safety with these things you know. 😈
In .25 4mm transferport is enough for about the 70ftlbs I mentioned!
My advice is make yourself a few valvebody’s or even complete bottles for every caliber you want to shoot!
Regards,
Marc
Thanks Marc. 🙂
I’m aware there are a whole bunch of variables that I can’t even begin to calculate, but I figure if I go ahead and build the ball-park I can get a bunch of balls in it and see how they kick. I can experiment with hammer weights and suchlike later, if necessary.
First is to build it. Then see if I can fill the bottle through it. Then see if it’ll fire and finally, if it does, put it on the chrony and see what I get. It’s all good fun and a learning experience too. 😀
The return-spring is about 50% stock force, so that should help (suppress vague worries about a tank-dump 😆 ).
- You must be logged in to reply to this topic.
Most of that stuff is over my head but the custom valve still looks pretty good 🙂