Q:

Edgun R3 .22: Shot String, Air Efficiency, & Trigger

This will be a long post, sorry about that. Ran into the dive shop to fill up the scuba tank yesterday. The shop owner put on a pressure gauge to show me how much the tank was filled, because I was “hinting” at him that I could only fill the gun to 180 bars (~2610 psi) last time with a full tank. The tank was indeed filled to the maximum pressure around 3100 psi in this new fill. Interestingly, again, I only could fill the gun up to ~180 bars based on the gun gauge; but the gauge in the fill adaptor showed 3050 psi (~210 bars). It seems that the pressure of my Edgun was somewhat under measured by 440 psi or 30 bars. 🙄

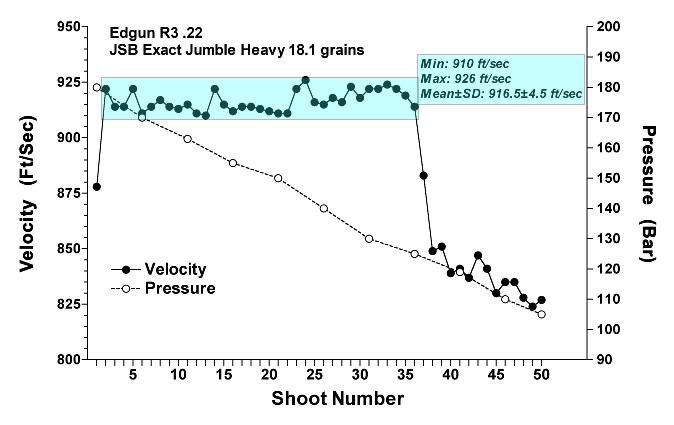
I tested a shot-string using Combro Chronograph, which is a very small and handy chronograph installed at the end of the muzzle area. The starting pressure was 180 bar (based on Edgun gauge) and JSB Heavy (18.1 grains) was used. The first shot was low in speed (878 ft/sec), but the subsequent 35 shots were consistent with average 916.5±4.5 ft/sec (minimum 910 ft/sec and maximum 926 ft/sec). The regulator came off around 130 bars (I think) because of a little rise in speed for several shots and then the speed dropped to around 840 ft/sec for about 13 shots in parallel with pressure drop. The POI (at 30 yards) started to drop slightly (~0.2”) at shot #37 (or the regulator was off at this point?) The POI didn’t further drop until pressure went below 105 bars. I got 35 good shots consuming ~800 psi (from 180 bar to 125 bar) from a 289-cc air tube with average 33.8 foot-pound muzzle energy, which is about 13.1 bar-cc/ft-lb efficiency of air usage. If using Zoco’s data – green-line shot string, 220 bar to 130 bar for 57 shots, ~32.5 fpe (http://talonairgun.com/forum/viewtopic.php?t=19488&postdays=0&postorder=asc&start=520), I got the number 14 bar-cc/ft-lb efficiency.

Based on the data from a shot-string of Royale 400 (without regulator; average 868 fps with 37 fps extreme spread) (http://www.network54.com/Forum/79537/thread/1318702313/FX+Royale+400+.22+-+90+shot+string+with+chart-target), which consumed 0.94 bar/shot (220 to 135 bars for 90 shots) with ~30.3 fpe from a 400-cc bottle, the air efficiency is 12.4 bar-cc/ft-lb. Using another shot-string (http://airgunadvice.net/viewtopic.php?t=12183), from 220 bars to 179 bars with 36 shots (average 954 fps with 28 fps spread) at ~36.6 fpe, I got the same number (12.4 bar-cc/ft-lb) for air efficiency. Using the data from the FX Royale 400 review video of Ted in Youtube, average 33.53 fpe and 20 fps extreme spread with high power, I got 11.1 bar-cc/ft-lb efficiency. If the medium power is used (884 fps with 31.4 fpe and 13 fps extreme spread), the efficiency will be higher at 9.6 bar-cc/ft-lb. It seems Royale is a little bit better than Matador R3 (standard length) in air efficiency without much sacrificing speed variation in the un-regulator gun.

I think Edgun can be optimized by adjusting the combination of regulator and power to reach max efficiency, but it will need a lot of trial. Or this is already at the optimal condition when Ed designed and set up the gun. What do you think?

p.s
I also installed a Harris bipod BRM-S model 6”-9” in late afternoon, and ran a few shots under high-gust wind (>20 miles/hr) before dark. It seems to improve the unstable sitting of the gun and increase the shooting accuracy. 😛 Will test more tomorrow if weather is good.


EdGun

All Replies

Viewing 15 replies - 46 through 60 (of 229 total)

1 2 3 4 5 14 15 16

Humps are there to be ground down – whether on a Gun or on a Person.

I hear what OG´s saying. I got my 2 screwer to work very good too by mixing,matching,polishing, trying out different springs and re-threading things. And i also removed the other screw. The secret is getting everything work in perfect harmony and that takes some time and trial/error but even the Matador-trigger can be made really good with predictable,crisp release without any creep and adjusted to preferred pull weight.

I know nothing about the one screw- trigger but if OG says the two-screwer is better – and i know how i got mine in the end – then that´s good enough for me.

Endo, nice job!

BUT, I remove the second trigger screw and only use the one closest to the trigger. I also adjust the length of the trigger bar rod until the trigger bar rubbing face is parallel to the trigger housing. Once the face of the trigger bar is parallel with the housing the front screw can be adjusted for a very short and light first stage and the second stage can be set up as light as you want.

Give that a try, I think you will like it!

Hoot bought a R3 that had had 2 prior owners. One of them had really screwed the trigger up. It was horrible!

HOOT asked me to look at the gun. I set up his trigger as I described and I was amazed with the way that it turned out! HOOT has told me that his R3 now has a better trigger than any other gun that he has ever shot. I have to agree with him on that.

The trigger turned out so light and crisp that I was afraid that a slight impact could cause a cocked gun to fire. I gave the cocked gun some pretty hard and sharp impacts to the butt pad and I couldn’t get the gun to discharge.

You might be able to get the cocked gun to discharge by dropping it but; who in their right mind is going to drop a cocked and loaded Matador?

I thought that I had all of my Matador triggers working pretty good until I did the trigger work on HOOTs gun. I now need to redo all of the triggers on my Matadors.

My 30 cal R3 has the newest style trigger. It only uses the front trigger screw and has a hump where the back screw used to be. It works pretty good once set but, I need to order another 2 screw trigger from Tony, do the mods to it and replace the stock 30 cal trigger with the modified 2 screw trigger using only the front screw.

I just can’t bring myself to grind the hump off of the stock trigger!

Again, this is going to be a long post.

This is to update my R3 .22 trigger mod. I have many problems with the trigger as mentioned in my earlier posts. I have tried many different adjustments on it but the problems remain. To the point it is really unbearable, I have to do something about it.

I tore the trigger assembly apart by punching out two steel pins (one for trigger and one for trigger-rod plate) in trigger housing. I found the plate has two dints. I believe they were created by the trigger screws. This suggests the roughness of the trigger screw, and I think the tip of the screw might not be grinded high enough (~0.9 to 1.1 mm). The white nylon (or some kind of plastic) washers (for trigger and trigger-rod plate) have inconsistent thickness (0.9 mm, 0.96 mm, 0.97 mm and 0.99 mm), and the surface and edge have burrs and some cuts. The trigger and trigger-rod plate are wobbling around, suggesting the washers are too thin. If I smoothed them out, the washer would not be useful (too thin). The washers need to be at 1.00 mm thickness for perfect fit. ALL these need to be corrected.

The original nylon washers are 3 mm id, 6.8 mm od. It is difficult to find the same size of washer, and I don’t like plastic things live inside the Matador. I finally got some M3 stainless steel washers with 6.4 mm od and 1.4 mm thickness. So, I sanded them down to 1.02 mm thickness and then polished them down to 1.00 mm. The trigger-rod plate, trigger, trigger-rod shaft were also sanded and mirror polished, especially the place where the friction will be generated. The stock trigger screws were also grinded higher and polished. I also made two longer trigger screws out from M3-16 cap screws (advice from Dr. Edgun, thank you Tedd). Their tips were rounded up to 2.8 mm high and polished, just in case if the stock screws are too short after adjusting the length of trigger-linkage rod (Tedd’s guns need longer screws).

I was not able to adjust the length of the trigger-linkage rod from the hammer side because it was loctited. So, I adjusted the length from the trigger side by screwing out the plate by 1 turn. I planned to add a thin M3 washer and replace the wobbling screw nut with a lock nut (M3), so the trigger-rod spring tension will not be changed during action. Picture 1 shows the parts from the trigger housing, new steel washers, trigger screws, trigger-rod spring, old screw nut and a lock nut.


Picture 1: Trigger parts

Assembling all these parts back is tricky. The trigger-rod plate needs to be installed first. If you install the trigger first, it will block the way of inserting the plate back to the housing. I lubed (with moly) all connection parts, including washers, and areas that could produce frictions. I used tooth-pick to move the washers around and do the initial alignment. To align them all, I inserted a plastic-stick, from a Q-tip, to the hole passing the washer and trigger-plate against another washer and steel-pin in the opposite end (picture 2). I let the plastic-stick to protrude out about 4 mm (see picture 2). Then put a small piece of duct seal to anchor the stick and to prevent it from falling out from the assembly (see picture 3). I drilled a hole (~8 mm od, 1.8 cm deep) in a piece of 2×4, and laid the frame, the side with Q-tip stick/duct-seal facing the hole, then punched the steel-pin in. The inserted steel-pin push the plastic-stick out from the assembly into the hole and flush the steel-pin on the frame. The trigger was installed in the same way. Finally, the new trigger screws were installed. The final appearance of the trigger assembly looks cool (picture 4). No more wobbling plate and trigger, and the trigger is smooth and feel good when “touching” it.


Picture 2: Using a Q-tip stalk (pink color) to align the parts.


Picture 3: Using a small piece of duct seal to prevent the stalk from falling out from the assembly.


Picture 4: Final assembly

Well, how does it shoot? I can’t draw a final conclusion yet. It requires weeks/months to tell its consistency, predictability and reliability, but the improvement on smoothness (5 stars) and the crisp of break (5 stars) are very obvious. It makes the shooting more enjoyable with this revived trigger. I like it, very much.

Hopefully, this is helpful to those who are interested in improving the old style 2-screw trigger in their R3.

Regards,
Endo

Endo,

Documenting the concepts along with the process as you have done is invaluable and no one else has done that here that I could find. Video’s of how to disassemble don’t help the in the conceptual understanding and the seasoned experts often leave the most important conceptual stuff out w/o realizing it. Someone who can document with their newly acquired knowledge as they work through it the first time is paramount for us novices. 🙂

Great job.

I already worked over the triggers on all of my bullpups (my two Eds have the single crew adjustments) and I have not noticed the behavior you are seeing. I am a big trigger guy and measure the triggers every few weeks but I am ultra sensitive to any change. I hope you get it worked out.

quote endothelium:

SECoda,
Thank you. The post is long. I just wanted to give as much details as possible. Hopefully, this will be helpful to people who wants to optimize the reg/HST. So, Tedd doesn’t need to keep repeating it. I am tearing down and working on the trigger now. Still waiting for parts to come to finish it. Hopefully this mod will fix my notorious trigger.
Regards,
Endo

The charts Endo created here are invaluable for guidance on how the Edgun regulator and HST behave in unison as well as his write-up. It took a while to really understand them.

HST_vs_Efficiency
Rggulator_Comparison

This post really should be a sticky labeled Edgun tuning guidelines or something to the effect.

quote endothelium:

This is an update, and a long post, on the shot string and air efficiency of my Standard R3 .22 Matador after regulator adjustments. The goal is to tune the gun to shoot at 890 fps with the highest standard described by Dr. Edgun: “3-4 fps shot to shot variation and a max speed spread of 10-12 fps”. I have played around the reg lately and my previous strings showed a creeping down of speed with shots (reducing ~6 to 8 fps; see previous post). I was not happy with it. So I re-adjusted the reg pressure and did some fine tune on HST. Here is what I have learned from tuning the Matador. I thought it might be useful to those who are interesting in optimizing the gun.

The goal is to get an optimal reg pressure and HST for speed ~890 fps (the range of best accuracy). Here is the protocol for my tuning:
1) Adjust reg to where you think it should be for the target speed (in my case, 1/3 trun-in from the stock setting to start with)
2) Fill the gun and turn the HST two turns out (reduce HST)
3) Shoot 5 pellets to ensure the HST is reduced enough to the speed around 100 fps below the target speed (my target speed is 890 fps)
4) Shoot 5-shot groups for each increment in HST (i.e., turning in the screw 1/8-turn for each tension increment) and record the speed vs. tension.
5) The amount of speed increase vs. tension increment should taper off and reach the plateau (this should be the optimal tension for the reg). The speed will drop if you further increase the tension. This is commonly referred as “1st peak” (but I stopped when speed reaches plateau)
6) The optimal tension might not match the speed you want (e.g., if the speed is lower than the target speed, see #7 below)
7) Increase reg pressure (or decrease reg pressure if the speed is too high)
8) Repeat the process from #2 to #7 (goal is to find the balance between the reg pressure and the HST for the desire speed).
9) END the loop if the goal is achieved.

Here is an example of the speed vs HST in two of my adjustments. The open triangle in the 1st graph shows the reg is set to 0.375 turn-in (135˚) from the stock. The speed is increased with increasing HST and reaches plateau around 2.5 turn-in with speed 880 fps. I further increased HST (3 turn-in) in the plateau region to reach the target speed 890 fps. In this setting, 194 bars starting pressure (gun gauge), I got average speed of 890.3±2.6 fps with 14 fps maximum spread and average 2 fps variation between shots (see 2nd graph). I had about 57 shots before a significant speed drop. There is no creeping in this string. I like these numbers. But the air efficiency (~14 cc-bar/ft-lb) is relatively low compared to the stock setting (about 13 cc-bar/ft-lb). This means that a larger amount of air is required for spitting out one ft-lb energy (lower value indicates better air efficiency). I think the reg pressure was set too low to effectively reach my target speed. To compensate that I had to increase HST beyond optimal level, and this would have caused a significant waste of air. As Dr. Edgun said “Edgun Matador owners are a bunch of picky bastards!” and I think he is correct. I re-adjusted the reg to increase pressure (0.25 turn-in, i.e., 90˚ from the stock) and the gun speed reached plateau at 890 fps with less effort (2.375 turn-in HST, 1st graph). The shot string, with 193 bars starting pressure (gun gauge), is now average 889.8±2.7 fps with 11 fps maximum spread and average 3.2 fps variation between shots (2nd graph). The calculated air efficiency was improved to 12.4 cc-bar/ft-lb (see the smaller slope of pressure-line with closed circle in 2nd graph) and the shot count was increased from 57 to 65 before dropping in speed. This setting also gives me some room to increase speed when I need it (of course at the expense of reducing air efficiency). But, again, I was not happy with some (3) shots exceed 9-fps change and a slight creeping up in speed with shots. So, I increased the HST a little bit to see if these hiccoughs and creeping can be cured. Now, I got 892±2.2 fps with 9 fps maximum spread and average 2.2 fps shot to shot variation (one hiccough with 6 fps). The speed creeping is gone. The air efficiency reduced a little bit to 12.8 cc-bar/ft-lb with 60 regulated shots. I gain something also lose something. I think the Matador has been pushed to its limit.

I see several benefits from this tune. Statistically, it has 1) significantly reduced the speed variation between fills, 2) significantly reduced the maximum spread of speed, 3) significantly reduced the speed variation between shots, 4) significantly improved air efficiency if HST is set to optimal level, 5) significantly increased the number of regulated shot. Non-statistically, I feel a lot better on my confidence on the gun. But the quest for the Optimal Edgun is never ending. In fact, the stock Matador shoots well, and there is no need to do these tunes if you are not picky on speed variations and air efficiency (either between fill, within fill, or between shots). Matador will still kill what he’s supposed to kill effectively and even kill what he’s not supposed to kill such as my double-pane windows. 👿

In the tuning process, there was a lot of try-and-error and many small incremental adjustments. I have used at least 4/5 tins of pellets and lots air. Without the advice and help from Dr. Edgun (Oldgoat/Tedd), this tune would not be possible. The de-gas tool he sent me has made the reg adjustment much easier and efficient, and the HST screw he made is also very useful. Thank you!

Hopefully, this post is helpful to those who want to push the Matador to its maximum potential.

Next focus will be the accuracy…. I think this is the most interesting and important one.
Regards,
Endo

HST vs Speed

Shot String Comparison

Hi Endo,

No its not a new gun, i ve owned it for a year now. And i think im around 5000 shots. The hst max was at 282 after that it would go down again. I wanted to have a litle room so i took it back to what i think was 276 m/s. I m ordering some new o rings this week, maby that will work. Next Friday, i ll be taking it to the gunclub to see how it preforms, As soon as i have some new o rings, ill let you know what the results are.

ed

I don’t think you have done anything wrong on the gun.
The max velocity spread is around 13 fps, which is not unusual. But there are some large spreads (~10 fps) between shots. In my stock .22, those large spreads between shots are significantly reduced by turning reg down to 3-4 o’clock position and same for my .25. You may want to clean the regulator and check if the o-rings in the regulator are okay and lubed, and no leaks in your gun. Is the HST at the optimal tension?

The second string looks better and there are two shots with ~8-9 fps spread. Is this a brand new gun? Have you let it break-in?
The gun will be more stable if you shoot it more.
Endo

Well the program decided to post it anyway, im a newb, im sorry.

ed

Sorry about that big thing in the screen, but i dont, really know how to get these graphs on this forum

Ill reframe from posting the other one, its very simular with the same problems.

If anyone knows how to get better results, please let me know.

ed

Hello,

Well i ve been bussy today. I ve tuned my edgun, but i didn’t give me the results i wanted, i must be doing something wrong, but i cant figure it out. The first graph is when i turned the reg. between 3 and 4 oclock. The second one is between 4 and 5 oclock. It keeps ginging me inconsistant shots in between good shots. My target speed was 276 m/s. The max was 282 m/s. The overall difference for both graphs is between 4 and 5 meter. (13 to 16 feet). Now this woudn’t be so bad, but there’s some shots in there that have 10 feet between the 2.

MIN 273,4 M/S MAX 278 ,3 M/S
CC/FPE 12,65


Attachments:

Hi, Ed:

It looks like you have an upward trend in your string. I think you will need to reduce reg, probably turning reg crosswise to 4 or 5 o’clock from stock position as a starting point. The frequency of large speed jump between shots can generally be reduced by turning reg pressure down. You will need to turn HST down by 2 turns then gradually increase HST (1/4 turn each time) to see where the plateau speed is. Then go from there by tuning reg again (increase or decrease, depending upon your target speed), and fine tuning HST to meet your need. Let us know how it goes.

Yes – ChairGun Pro is the tool. It is a free software from Hawke Optics that will give you info on changes in POI corresponding to a speed change. This software is very useful and pretty accurate.

Regards,
Endo

Off by 0.80″ based on chairgun.

275mps 16grn bc 0.029 drop 29.46″
280mps 16grn bc 0.029 drop 28.66″

Use Chairgun Pro.

quote I MIGHT BE CRAZY:

I forgot,

Say im shooting at 100 meters. Point zero is 275 ms/ (bullseye). If the next shot comes out at 280 m/s . How much more ellevation wil the 280 m/s shot have on the target? Any one know how to do the math on this, please explain it to me. (i would like to know what the tune theoreticly wiil do for me at 100 meters)

ed

Viewing 15 replies - 46 through 60 (of 229 total)

1 2 3 4 5 14 15 16
  • You must be logged in to reply to this topic.