Q:

ATN COCKING LEVER, INSTALLATION, AND ADJUSTMENTS NEEDED!

:hoot:

YES! It’s all metal. It’s quality construction!

The kit contains loose parts that YOU will need to install. Most of the kit is pre-assembled, so don’t panic when you look at the picture and don’t see corresponding parts in the bags.

First….the parts list… but some are already assembled in the kit, note my arrows as I tried to determine if everything arrived:

Now, this is how all the parts ended up as “assembled” or “loose”….note there are only six parts you actually need to ‘install’.

Here are the parts you need to attach…two short screws in the front, two long screws in the rear that attach the cocking block to the side of the gun, and finally one screw to attach to the gun’s internal cocking bolt. That’s five (5) moving parts to attach…the cover plate does have a right and wrong side! Look for the side with the angled hole entries, that side faces out.

Now…a word of warning, take note, at the far right of the below image, the block the lever is hinged to (201) and it’s two screws (210)…are ADJUSTABLE parts, and must be leveled before tightened in place. Fail to do this correctly and the gun won’t cock smoothly, if at all. Bold print at bottom of post explains all….

I’m going with a left handed installation.

CRITICAL INSTALLATION CORRECTION…MUST READ!!!

THE LEVER (PART 204) ATTACHED TO PART 205 MUST BE LINED UP CORRECTLY BEFORE TIGHTENING THE TWO LONG SCREWS THAT HOLD PART 201 IN PLACE AGAINST THE SIDE PLATE! PART 201 IS ADJUSTABLE IN POSITION TO PERMIT THE COCKING LEVER TO OPERATE SMOOTHLY, IT IS THEN LOCKED IN PLACE BY THE TWO LONG SCREWS (PARTS 210).

I suggest the following sequence…

1) SNUG-TIGHTEN THE FRONT TWO SCREWS, THEN START THE TWO LONG SCREWS THAT HOLD PART 201 TO THE SIDE PLATE, LEAVE THEM LOOSE.

2) NOW ATTACH PART 205 WITH THE THICK SCREW 208 TO THE SLIDING CYLINDER INSIDE THE GUN…YOU MAY TIGHTEN IT FIRMLY AT THIS TIME.

3) THIS IS IMPORTANT…YOU MUST “ADJUST” THE ANGLE OF PART 201, THE HINGE BLOCK, SO THE COCKING LEVER IS LEVEL AND SLIDES BACK AND FORTH SMOOTHLY! PART 201 DOES NOT SCREW AUTOMATICALLY INTO IT’S CORRECT POSITION.

4) YOU MUST GENTLY ADJUST PART 201 UP/DOWN UNTIL THE ATTACHED COCKING LEVER TRAVELS LEVEL AND EVEN INSIDE THE SIDE PLATE. FAILURE TO DO THIS CAUSES PART 205 TO “GRIND” AGAINST THE COVER PLATE, AND THE COCKING LEVER BECOMES EXTREMELY DIFFICULT OR IMPOSSIBLE TO MOVE.

5) ONCE THE COCKING LEVER MOVES BACK AND FORTH, BUTTERY SMOOTH, AND HOLDING PART 201 IN PLACE, CAREFULLY FINAL TIGHTEN THE TWO LONG SCREWS (PARTS 210) THAT HOLD PART 201, TO THE SIDE PLATE. WHILE TIGHTENING THESE TWO LONG SCREWS, MOVE THE COCKING LEVER BACK AND FORTH A FEW TIMES TO ENSURE THE COCKING LEVER IS STILL LINED UP STRAIGHT, BEFORE FINAL SNUGGING THE TWO SCREWS DOWN.

CAREFUL INSTALLATION OF PARTS 201 AND 210 ARE THE KEY TO PROPER ALIGNMENT OF THE COCKING LEVER, AND IT’S SMOOTH OPERATION.

(Phew!!! I’m tired. It took three hours to pinpoint the real cause of the problem.)

kind regards,

Exhausted Uncle Hoot:

UPDATED INSTALLATION INSTRUCTIONS 1/7/2017

Photobucket sucks!!!![/b]

Airgun Technology

All Replies

Viewing 15 replies - 76 through 90 (of 113 total)

1 2 3 5 6 7 8

:hoot:

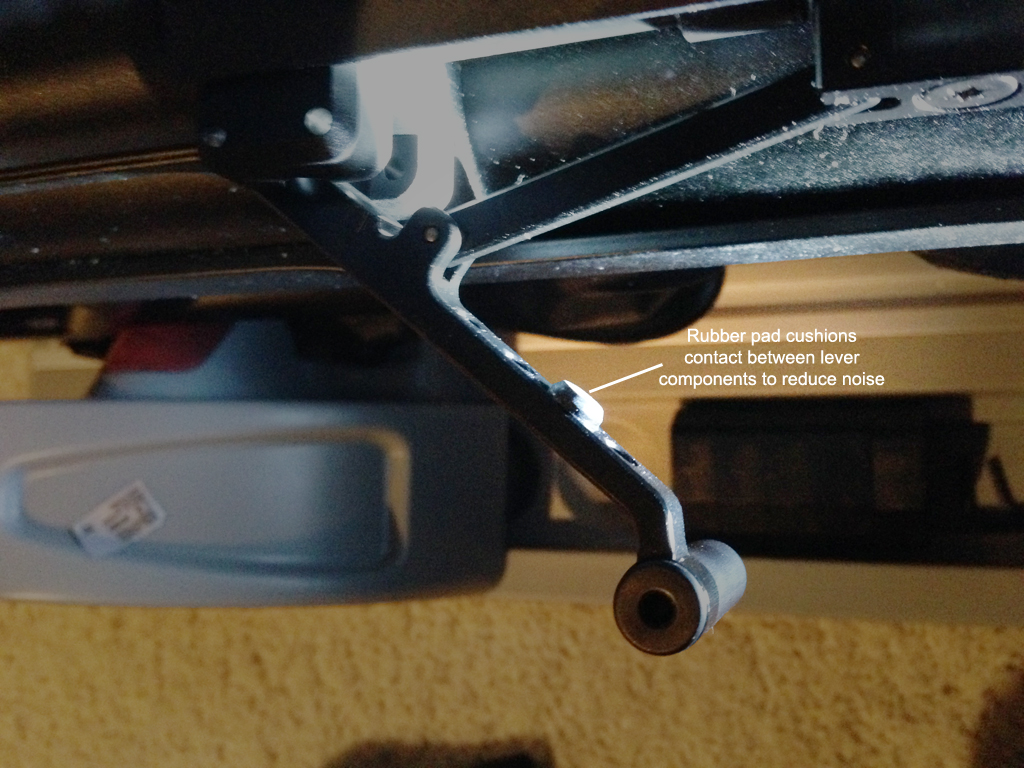
Rubber grommets are available at most hardware stores.

Hoot:

UPDATED INSTALL INSTRUCTIONS 1/7/2017

Guykuo the scavenger 😛

What I actually used for the rubber cushion was shaped more like a little mushroom or grommet. That let it be jammed into a hole of the lever and hold in place without relying on adhesive. An adhesive pad will also work, but may slip off. Sorry, I don’t know a source for these. I repurposed this little corner cushion of a small display board.

:hoot:

Airgun Technologies needs to take note. Their research and development program is being done for free on this forum. These mods are cost effective, and enhance the gun’s performance…why not incorporate these features into the next production run? The cost would be pennies to produce…

When my flat 10mmX5mmX3mm magnets arrive, I will experiment on different locations. There are at least three places where the magnet would work. I’ll get a package of 50, and would be willing to share them, for a small donation for mailing and handling.

Those tiny rubber adhesive pads are available at Wallyworld, and just about any hardware, drug, dollar, or auto supply store.

Hoot:

Following my tradition of fuxineering.

Here are my mods to the ATN Cocking Lever to hold the breach open when desired and reduce mechanical noise.

A small rubber pad embedded into one hole of the cocking lever handle cushions the “click” that happens when the lever is closed.

Thin super magnets are readily scrounged from inside old desktop hard drives. You could also purchase new ones, but I had one available. The magnets are very brittle and can be snapped down to the desired size using just two pairs of pliers. Be careful of the fragment edges. They can be very sharp. I discovered a cut on myself a while later. I recommend sealing the broke edges with some lacquer to seal the magnet from corrosion.

The magnet is mounted under the Pictanny rail. Position it so it is not in direct contact with any moving parts. Here it is in proper position on my Vulcan to attract and hold the cocking slider when it reaches rearmost motion. It have positioned it to avoid an actual physical contact. It just gets close and that is enough to hold the breach open. The amount of hold force is tiny and you hardly notice it pushing the lever forward. You will need to experiment to get the correct position. It was a bit easier on my Vulcan because the magnet sticks to a steel MOA plate I have under the rail. On a normal Vulcan you are attaching the magnet to just the aluminum rail. On mine it basically held itself in position. Once proper position is found, glue in place.

Be sure to position it deep enough to clear the slotted side plate. Also, check that the maximal rearward motion of the cocking system does not impinge with the magnet.

Here is video of how the magnet holds the lever and breach open. You can see how little effort is needed to move the lever and how well it remains open for magazine changes.

http://cosalient.com/picture/vulcan/magnet%20holding%20ATN%20lever%20open.mp4

Can’t. The lever cams shut when you close the bolt. One cannot pull it open from the other side. The camming action locks it pretty solidly. I tried. Nope, solidly closed.

If I modify the lever so it doesn’t cam shut. I have to also add another mechanism to hold the bolt shut during firing, but is still openable with pulling from the opposite side. Either that or the two levers need to be linked so pulling one outward, also pulls the other outward like a wine bottle opener.

Fortunately, not too many seem to want that ability. I’m just spoiled, by having had that ability.

:hoot:

If you had two open side plates, could you not simply put a protruding cocking arm on each side? Not a lever, just an extension to pull back and cock the gun? That’s all the lever does and it needs no lock down slot when cocked and returned to the front of it’s plate.

Seems like you could do this with two OEM cocking handles, and an extra open plate for the other side.

Hoot:

No, I mean something different than being able to move from side to side sequentially. I had my Vulcan set up so I could cock it from either side, at will. No need to move the knob side to side, because I had cocking knobs on BOTH sides at the SAME time. That let me switch cocking hand depending on hold or support.

Can’t do that with two levers, one on each side due to the cam effect. I’m pondering how to do the lock down without cam so I could have levers on both sides simultaneously. Maybe another magnet system.

Or…. a rotary lever like the Gallahad’s with a rack and pinion system. Just thinking….

quote guykuo:

The only down side of the lever is losing my ability to cock the gun from both sides. It’s a fair trade off for the easier lever.

:hoot:

It’s interchangeable…you just have to move the cocking knob to the other side, and flip the whole thing over.

You can make this work on either the left or right side! In fact, the instruction sheet that comes with the kit shows both left and right hand installation.

Or did I misunderstand your question???

Hoot:

There should be room on the inside surface of the slotted plate to fit a thin magnet. It would be totally invisible from the outside.
That is my plan. A temporary layer of tape as a spacer will let me use the slider itself to determine the magnet position, but avoid actual full contact. Then glue in place on the inner surface of the slotted plate.

I have plenty of thin super magnets scrounged from inside hard drives. They are brittle and can be snapped like glass to desired size.

Evgeny is already shipping out a plate to make up for my missing one. I could cut a new plate myself, but it won’t be as neat as a genuine one.

The only down side of the lever is losing my ability to cock the gun from both sides. It’s a fair trade off for the easier lever.

quote birdman:

HOOT , not to break your balls but a picture is worth a thousand words so post a picture of this magnet set-up .

FROM : THE BIRDMAN

:hoot:

Dear Feathered Fiend…

Even as we speak…even as we speak…..important Chinese officials are feverishly removing all possible obstacles to my shipment of fifty (50) depleted plutonium super magnets, of the appropriate size, so that I might install this miracle mod on my highly modernized, and deadly silent, .25 Vulcan bullpup!

Once in place, I will generously post pictures of the setup for all to watch in awe.

Patience is required. The top authorities at China Post have been emailed and are vigilantly watching for my shipment…in order that it may be moved to the front of the line.

As for my “balls”…they are already busted, so any indication that someone might break them is a hollow statement. I had the wires to their control chip cut after my third child. I had plumbers remove the remaining debris from the train wreck that had been my sex life, after I enjoyed a mild case of prostate cancer, that had metastasized back in 2001. There is no chemotherapy for this disorder, so following surgery that would have killed a normal man, they irradiated my sorry ass for seven weeks. I glowed in the dark like a cheap watch for three months before I began to dim.

Sincerely,

Kindly ‘Ol Uncle Hoot:

Tossing precious pearls of insight before the dribbling snouts of ignorant swine since 1967…

HOOT , not to break your balls but a picture is worth a thousand words so post a picture of this magnet set-up .

FROM : THE BIRDMAN

quote Zoey:

I neglected to state that the video I posted earlier in this thread was not of my creation. My apologies, and I had no intention of taking credit.

:hoot:

No need to apologize Zoey! No one watched it anyway…

Sincerely,

Kindly ‘Ol Uncle Hoot:

I neglected to state that the video I posted earlier in this thread was not of my creation. My apologies, and I had no intention of taking credit.

quote guykuo:

A small neodymium magnet mounted to almost touch the the concave slider piece (205) just as it reaches full rearward motion would be an easy way to make the lever hold open automatically even when horizontal. I think I will mount a magnet on the side plate once I get a slide plate.

:hoot:

The actual cocking arm is made from a Ferris metal, not aluminum, so a small, flat, powerful magnet would indeed hold the cocking lever in the open position when it is cocked.

I just tried it with a round magnet, and it had enough pull to hold the lever in place, so a flat magnet would work just fine, as it would have more surface area for the cocking lever to come into near proximity to. There’s just enough space between the hinge block and the lever to permit the lever to be cocked without actually touching the magnet.

The hinge block seems to be made from aluminum, so the magnet won’t simply stick to it. A dab of silicone glue, or some such, would hold it in place nicely! I believe a flat magnet 1/8″ to 1/4″ wide, by 1/2″ long would work just fine. Just enough room to glue the ends of the magnet in place.

Nice idea!

Hoot:

Viewing 15 replies - 76 through 90 (of 113 total)

1 2 3 5 6 7 8
  • You must be logged in to reply to this topic.