Q:

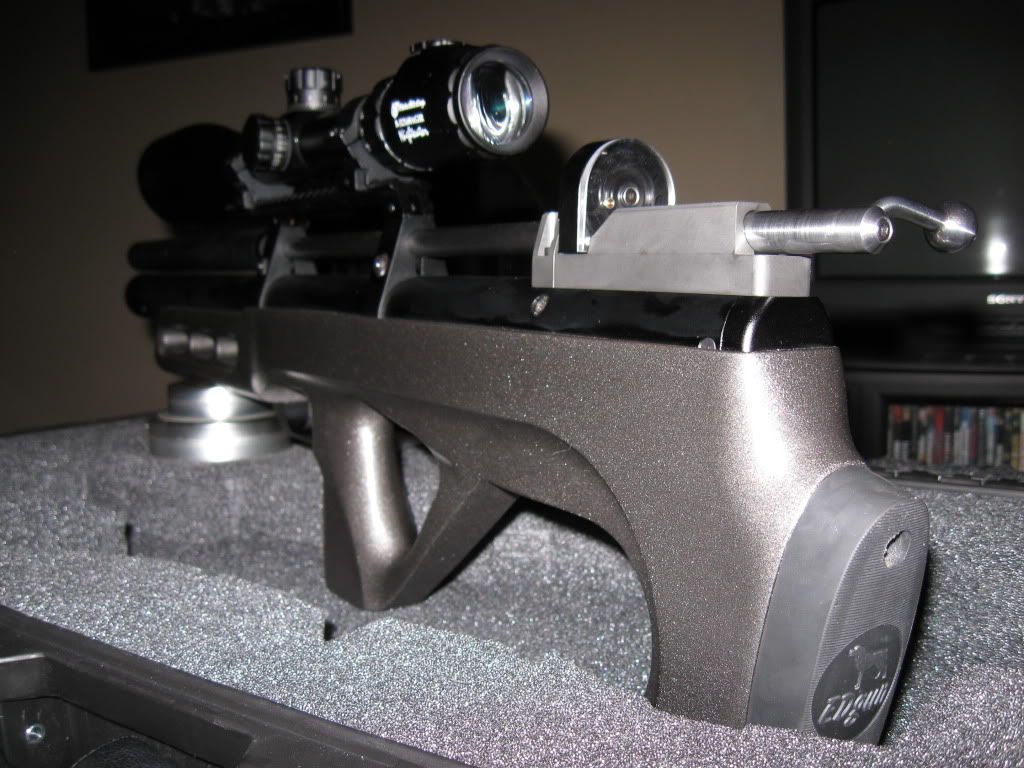
EDgun Matador R3 versus Kalibr Cricket, my comparison….

Hi guys,

Warning for those who don’t like images:

This is going to be a thread with lots of graphics….. πŸ˜‰

As promised, I’ll try to share with you my personal opinion and findings while comparing these beauties:

As some of you may know, I have two Matador Std R3s and I have one Cricket (with access to another one). All are cal.22……

My wait for my Matadors should be well documented on this very forum…..

The Crickets were a part of a group buy masterminded from Europe somewhere. The Crickets were shipped in parts to Norway and reassembled by my good blueprinting friend Egon Olsen. In the process he had to remove a “restrictor” screw that had been put into the guns before shipment. Most probably because of Power limitation rules at origin….

The Crickets arrived with no documents whatsoever. No instructions, – no nothing. I don’t think this is standard procedure though…..

The Cricket weighs less than the R3, – and is approx 5 cm shorter. Not a lot, – but overall it makes the Cricket even easier to handle than the already tiny R3….

The side by side comparison was done from my modest little shooting table at my summerhouse:

– and the shooting range is here, – with my target set up at 46mts:

Why 46 mts ? Simply because I could not pull my shooting stand further back right now. A huge tree has fallen during winter, and all the branches have taken up my space… πŸ‘Ώ

First problem: How to fill the f…. Cricket ?

The fillprobe nut is so tiny that a standard foster coupling gasket will not seal. The entire probe is small, – and you fear you may break it while trying to tighten it:

The above (sorry for the image quality) is a comparison between ED’s, Cricket’s and Falcon’s fill probes. You can probably see what I mean….

As I could not make a standard Fostergasket fit, Egon had to make special gaskets that we fitted into the Foster coupling itself. Not an ideal solution, – and I have no clue how long it will last…….. πŸ™„

On the fill probe: Matador 1, Cricket 0 points.

Air filling:

I honestly dont like any of the solutions that these two manufacturers have chosen………..

The Cricket people have come up with the worst. To expose the hole for the fillprobe, – you have to slide forward the tip of the reservoir. But that stupid tip is retained by a spring, – and slides back with a smack once you let go:

If you’re not careful when taking the fillprobe back out, the tip will spring back and ruin the fill probe O-rings faster than I can say my name….

While filling, the “tip” rests on the previously mentioned small nut. And there’s not a lot clearance. So a bigger nut (for those with lathe skills), – is not going to help you much. A thicker nut might…….

In short: A very stupid filling system, – BUT once you know how to operate it and care is taken, – at least it covers the hole when filling is over.

The Matador does not come with anything to cover the filling hole at all:

I use tape right now, – but a plug of some sort would be good….. πŸ˜‰

My preferred system would be that of Falcon:

The tip of the reservoir has been turned into a curled “collar” that you rotate to expose the hole. Simple, easy and effective. And few moving parts that may break or go astray……….

Now, I have no idea how much air I can fill into the Cricket, – and the gun gauge certainly does not help much:

I trust the gauge on my fillkit, – and 3000 psi is roughly on the border between green and yellow…….

Points for airfill procedure: Matador 1, Cricket 0. In my opinion….. πŸ˜‰

Cheers from Trygve πŸ˜€

To be continued……….. πŸ˜€

(if you so desire…… 😳 )

BullPup General Chat

All Replies

Viewing 15 replies - 586 through 600 (of 664 total)

1 2 3 39 40 41 43 44 45

I have earlier mentioned “shooting comfort”, – and the above discussion is also about that in a way…… πŸ˜‰

If you sit at a fixed location with a tin of pellets next to you, – the mag issue may not be that important. But when you’re out and about, – it is not nice to have to search through pockets or whatever to find another pellet. At least I don’t think so…….

But first: A look at ergonomics…..

The Cricket is smaller than the R3 and also lighter. Not a lot, but when moving around you feel the difference. There’s no doubt about it…..

The but pad is located slightly higher on the Cricket than on the R3. May fit some, but if you’re a big guy like me, – the lower butpad on the R3 feels more easy to shoulder. Ideally both guns should have adjustable butpads….

How the Cricket people were thinking when the designed the breech block like this I don’t know:

This is a disasterous “Cheek piece/rest”. It is sharp, cold and with a wrong angle. There are lots of discussions about this on various forums, including the Russian……

I don’t know who is making these, – but there seems to be a lot of different solutions out there. Here are two examples borrowed from the net:

They are both adressing the same issue, – and that is easy to understand…. πŸ˜‰

Add to that the sharp edges on the Cricket stock, – and you end up with ergonomics that are not very impressive…..

BUT it has a 14 shot mag (it actually comes with two), – something that makes up for a lot of it…….

In my opinion that is……. πŸ˜‰

They also have a stock option where room for 4 extra mags has been incorporated.

Ed has designed a slightly different “Cheek-rest”, – which may not be to everybody’s liking, – but at least it has been angeled properly:

But it is still cold, – it may not give you a relaxed view through your scope etc…

But 100 % better than the Cricket’s for sure…… πŸ˜€

In comparison with the Cricket, – the R3 feels heavier and more bulky to carry around. But it has no sharp edges to worry about, – something which at least I’ve learned to appreciate……

But alas no mag. And it does not take you a hell of a lot of walking about with this “stiff to cock” animal before you begin to realize that a mag is good to have. Not only for “follow-up” shots, – but simply because then you know where you have your pellets……..

A bipod is nice, but adds weight…..

It’s not only handy to shoot from, – it also gives you a way of putting down your gun without having to worry too much about scratchmarks etc…..

None of the guns comes witha bipod fitting/stud, – so you have to sort out that yourself……… πŸ˜‰

While in doubt, – for me the mag thing is so important that if forced to choose from “shooting comfort” criteria, – I fear the Cricket might be the winner……..

I have been experimenting a little with “solutions” to the above problems….

I want a nice “cheek-rest” that gives me a natural position viewing through my scope, – but I don’t want to add weight….

So far I came up with this idea for the Cricket:

Don’t look at finish, – it’s not even a prototype…… 😳

It’s just a bit of foamy pipe-insulation that is sold by the meter at the plumbers. BUT it provides a nice comfortable “cheek-rest” that costs next to nothing. It’s been stuck on with double sided tape, – and really it does the trick. It may be removed easily.

An idea to pursue for those in the know….???? πŸ™‚

Likewise, I have used the same material for the R3, – but with some added benefits:

Also this needs to be refined a whole lot, – but it works. Not only do I have a cheek-rest, – but I also have a basic pellet holder. No need to fumble for the next pellet, – it’s right there in front of your hand……

It does not replace a mag, – but it makes the whole process a lot easier in the field. AND it doubles as a cushion for your R3 if you want to put her down somewhere.

I have seen lots of solutions up the same alley but related to the 2.5s only. Now, if somebody can come up with a nice looking solution along the same ideas as above (most important, – it has to be light), – I may reconsider……

But yes, I still want a mag solution though……… πŸ˜€

seen pix of that particular magazine…new ones hold 40 pellets and it might not prove that hard to reverse engineer that design to spring driven similar to the old Mitchell teardrop drums for the 10/22
still would have to work out an automatic shuttle activated by retracting the bolt
likely end up a bit Rube Goldbergish…

been pondering picking up a 3D printer, it might just be the way to go to burn out most of the basic parts on the somewhat cheap in black ABS
still would be a headache prototyping it

There are a couple of vids, on You Tube, of a Russian guy that made a mag that mounted to the barrel of the Matador. It is manually indexed and had a chute that slid a pellet down into the opened pellet loading tray. The mag holds at least 30 pellets and maybe more.

It is pretty slick and it didn’t look like it would affect the cheek weld any.

I agree with Riverside….he doesn’t speak much but when he does, I tend to listen carefully. I know he riles a few people from time to time, but he has some solid thinking in most of his statements regarding pcp usage and design.

Cheek weld is probably the single most important turn-off to potential bullpup users. Having observed some of the Youtube Russian pcp bullpup clubs having a shooting outing, I noted several of the bullpups had been modified with a bolt/screw-on wooden cheek piece strategically located to allow good scope access.

This would be an excellent mod.

H 😯 😯 T

Trygve, here is how I adjust the trigger pull. I pull the action out of the stock and take both trigger adjusting screws out. I round the threaded end of a longer 3mm screw and put it in the front hole in the trigger. I don’t use a screw in the second hole. I turn that screw in until the hammer will not cock and then back the screw out a little. Watch the rear of the trigger bar that is behind the unused second trigger screw hole. You don’t want it to touch the trigger rod bar as the trigger is being pulled. If the rear of the trigger touches the bar, you lose mechanical advantage and the trigger pull will increase.

I start the fine tuning at that point.

I like a short and light first stage and then I want the trigger to come against a small β€œnotch” A slight increase in pressure fires the gun. While I am adjusting the trigger, I cock the gun, slide the bolt back in just a little and pull the trigger. Holding the bolt all of the way back gives false trigger pull results.

On my R3 22 long, when I got the trigger set the way that I wanted it, the front trigger screw would sometimes slide off of the front of the trigger rod bar and it would get stuck there. I would have to pull the bolt back and them β€œjiggle” the trigger to get it loose. The trigger rod’s length was adjusted too short as it came from Ed.

I had to remove the 2 mounting screws in the trigger housing and the 2 mounting screws in the front side of the hammer housing, work the trigger housing out of the hammer housing and rotate the trigger housing out 2 turns, increasing the trigger rod’s length. When I got the trigger housing bolted back on, the trigger rod bar now set lower in the trigger housing and I had to adjust the trigger adjusting screw out and start the adjustment over. The R3 22 long’s trigger turned out lighter than the R3 25 long’s. The 25 uses more HST and it takes more force to move the hammer sear away from the hammer.

I took both guns to the range and when switching from the 25 to the 22, the first couple of shots would go off before I was ready after I was use to the slightly heavier trigger pull on the 25. IIRC, the 25’s trigger now averages around 300 grams pull, I don’t know what the 22’s pull is but, it is probably too light and I might turn it up some.

How about something like this attached to the stock under the action?

This works brilliantly on the AF rifle and keeps any type of pressure off the bottle.

When I get my Lelya I will be making one for it as a prototype or if I can get my hands on a Matador I will get what I need to make them and have the owner who let me measure their rifle try the first one out. πŸ˜‰

wouldn’t really need to be a “conversion” so much as a magazine designed to drop into the single shot breeches loading slot
desinging such a mag tho would be a serious pain.

there is a manually indexing magazine out there being sold overseas

there was a fellow awhile back on the Yellow that altered his Edguns breech to take a FX magazine
my main concern is what this may do to cheek weld against the breech

I think Multishot conversion kit for 2.5 already exists, but no one knows when we will see it here in the states.

quote Hoot:

The world wants a “Krickidor”!!!

Ed, we wouldn’t think less of you if you used some of the Kricket’s features, like the magazine and side-lever.

Of course, yours would be better in quality. If there was a “Krickidor”, I’d order another Edgun!

Regards,

H 😯 😯 T

PS: I think a seperate kit to modify the Matador to a repeating pcp would be a good idea. You won’t have to create a whole new gun, and the current owners could buy the kit, and then everyone’s happy!

The world wants a “Krickidor”!!!

Ed, we wouldn’t think less of you if you used some of the Kricket’s features, like the magazine and side-lever.

Of course, yours would be better in quality. If there was a “Krickidor”, I’d order another Edgun!

Regards,

H 😯 😯 T

PS: I think a seperate kit to modify the Matador to a repeating pcp would be a good idea. You won’t have to create a whole new gun, and the current owners could buy the kit, and then everyone’s happy!

in my gun the ballbearing har already cause a longitudinal groove where it slides on the radial ridges.
the ridges DO cause friction, they DO change things and the ball bearing is slowed by them.
“solved” the issue wt sandpaper and moly grease.
i didn’t insist too much not to alter the ID of the tunnel.
give it a shot like i did and you’ll improve things a lot.
course i wish i got the good one from the manufacturer at the very beginning.
pics and full story in my original post

cheers

quote oldgoat:

Well; my tube of lithium grease says that it is “all Purpose”.

Hmmmm. I wonder if they make a warming version for those “dry and hagged bores”!

I haven’t come across any of those yet but;

Haven’t come across what exactly ????

The “dry and hagged bores” or the “warming version” ???? πŸ˜‰

quote oldgoat:

Have you tried the trigger mod yet? If not, I think that you will like it.

I’m afraid not……. 😳

Been away too much and now:

Link please, I seem to have lost it……… πŸ˜₯

Or even better: Give it to us here in a step by step tutorial for dummies like myself…….. πŸ˜€

Cheers from Trygve who is desperately seeking information about the size of the Cricket reservoir……

Has anybody got any clue ????

Please ……. πŸ˜€

Well; my tube of lithium grease says that it is “all Purpose”.

Hmmmm. I wonder if they make a warming version for those “dry and hagged bores”!

I haven’t come across any of those yet but; I guess that it wouldn’t hurt to be prepared!

Have you tried the trigger mod yet? If not, I think that you will like it.

When I got my R3 22 long, I had to put a scope on it and shoot it out of the kitchen window a couple of times. I thought WOW; I need to mod the trigger! It had a long first stage and a slightly hard 2nd. My 25 now has a light and short 1st stage and then comes up to stop. Just a slight amount more pressure and the gun fires. The 22 now has a lighter trigger than the 25, due to the added HST on the 25.

I thought that I was maybe interested in buying a Cricket. After reading your topic, I don’t think that I am interested in one.

quote oldgoat:

….. I guess that I’m Ed’s favorite brother! πŸ˜†

I wouldn’t be suprised………. πŸ˜‰

I wish I could add sound to my images, – but I have no clue about videos. The sound made by MY bolt as it travels through the bore speaks for itself…. πŸ™

I’ll get some white lithium grease from Egon tomorrow. That may change matters. If not, – your tip sounds good…….. πŸ˜€

As for the brownish front breech block, – it’s just a cosmetic issue but I am surprised your favorite brother would ship it like that….. πŸ˜‰

Thanks a million Tedd, – please stay onboard with whatever comments you desire….. πŸ˜€

Old guys like ourselves should be used to dry and hagged bores…… πŸ˜‰

I am not unfortunately……. 😳

Cheers from Oslo….. πŸ˜€

Hey Trygve, you cranky old cuss! πŸ˜†

When you finally get the stripped allen bolt out and the cocking bolt removed, look down thru the screw’s slot. You will see a β€œhole” that is slightly drilled into the breech block’s bore. The bolt has a ball bearing in it that is spring loaded. That ball drops into that hole when the bolt is rotated closed. That ball might be dragging on the β€œgrooves” on the inside of the rear breech block.

With any lube in the breech block bore, the “grooves” shouldn’t make a difference as the bolt would just ride on the top of them. I think that the spring loaded ball bearing is causing the drag that you are having. If the grooved bore was greased, and the bolt didn’t have a spring loaded ball bearing, it might actually have less friction than a greased smooth bore.

Sorry about the crappy pic. Cheap camera, too many beers and this topic made me have a couple more while tearing my R3 down to take this pic!

That’s my story and I’m sticking to it! πŸ˜†

You could try polishing a very thin straight line up the inside of the rear breech block’s bore where the ball rides on as the bolt is being cycled back and forth. To me, it looks like you would need to polish a straight path that was about 30 degrees counter clockwise from the drilled hole. Polishing a 1/8” wide path wouldn’t result in any added sloppiness in the bolts movement and might smooth the bolt’s cycling up.

The screw in my bolt wasn’t stripped out, my rear breech block doesn’t seem to be as badly grooved as yours and my front breech block is black. You, Ed and I might be air gun brothers but, I guess that I’m Ed’s favorite brother! πŸ˜†

quote sparky69:

Hey zoco how did yo obtain the cricket rifle if you don’t mind me asking?
Thanx in advance.

Hi Sparky,

I was invited to take part in a group buy masterminded from Europe somewhere I think. Huub who posted above should be able to tell us more if he so desires. I’ll leave that to him…….. πŸ˜‰

quote dvdrw:

…….This type of screw seems veeery familiar.

I think Ed should consider investing in a much stronger metal alloy in the screws all over the Matador.

I would not say no to that !!!! πŸ˜‰

quote kazzz:

For me it seems that the trigger “unit” and its parts are more rock solid from the R3 (and R2.5) then the Cricket.

Kazzz made this statement a little earlier and we talked a little about adjustment of hammersprings in the two rifles and also dwelled for a while with the trigger mechanism of the Cricket…..

Sorry for going around in “circles” here, – but as I have my R3 partly dismanteled here, I thought it might be a good idea to show you a little more in detail how the R3 works.

Again I apologize to those who know (skip the following πŸ˜‰ ). This is more for those who are less experienced (like myself… 😳 ).

Here’s the R3 action with bolt mechanism separated from the rest:

From bottom and up you see the set screw for the hammerspring adjustment and the silvery looking adjuster.

The round hole on the side reveals the sear mechanism and you can see the gun is not cocked.

Above that is the reservoir “departement”. The “thing” that sticks up from it in the middle left part of it is the “hammer”.

Same level right hand side (and annoyingly brownish in color compared the the rest) is the breech block. The barrel end is threaded and screwed into this block where you also find the “transferport” (the opening where air travels through into the chamber behind the pellet). On the left hand side of it you see the “pellet tray”.

Finally on the very top, – the bolt action mechanism that I am not overly happy with because of lack of smoothness in operation.

When you pull back the bolt, – the metal “lump” hanging down from the “bolthouse” travels with it and pushes the hammer back until the sear engages, – and the rifle is cocked.

Seen from underneath the cocked gun lookes like this:

Inside the hammerspring there is a bolt that is linked to the hammer itself. When you pull the trigger, this bolt shoots off to the right in the picture and rotates the hammer around the rightmost pin you see in the image. The top part of the hammer springs forward and hits the valve stem.

From the top, a cocked R3 looks like this:

You see the hammer ready to spring forward and the point of impact on the hammerhead itself. You can also see the stem of the valve that will be hit upon firing. The power (hardness of the impact) decides the amount of air released by the valve.

Here it is uncocked:

Going back to Kazzz comments about sturdyness, – there is no doubt that the R3 trigger mechanism is rock solid. It’s got a heavy duty “Sherman tank” sort of feel to it, – and is veeery different from the more “girly” mechanism of the Cricket…….. πŸ˜‰

Did I make myself clear ??? πŸ˜€

Viewing 15 replies - 586 through 600 (of 664 total)

1 2 3 39 40 41 43 44 45
  • You must be logged in to reply to this topic.