


Making the .25 Edgun quiet, easily and inexpensively…
The key to the Edgun .25 making less noise is reducing the air pressure at the muzzle. There are a few ways to do this without engaging in exotic baffle designs, or spending money on an aftermarket shroud or moderator.
Here’s how it’s done:
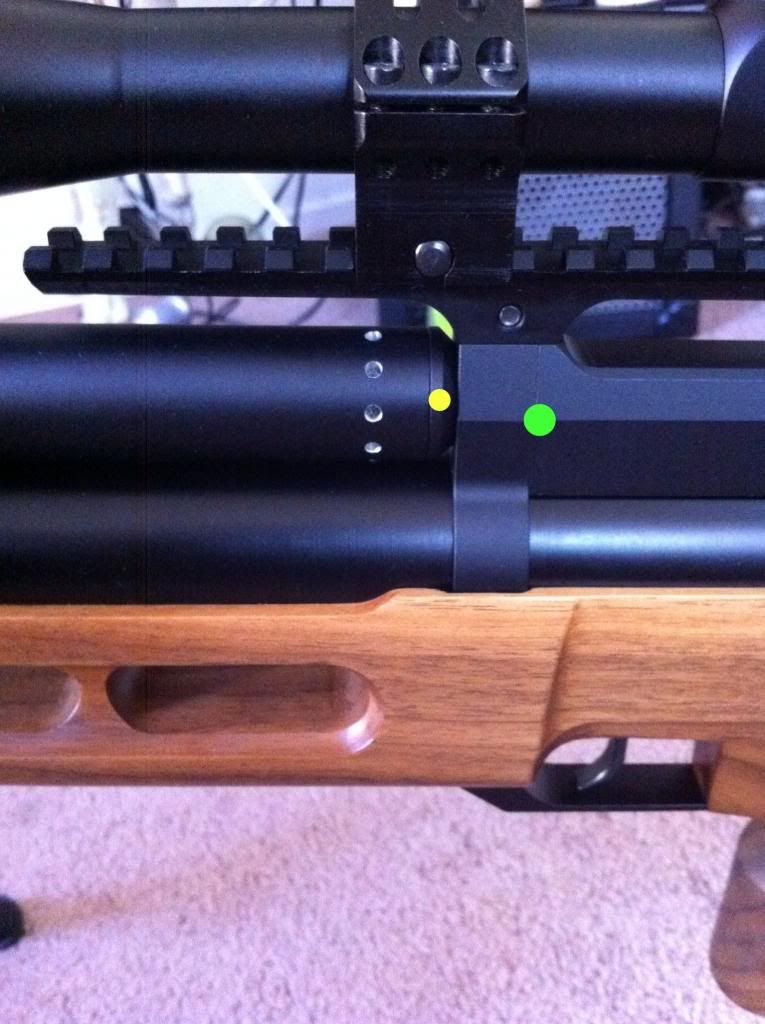
The first step is to remove both the baffle cover, which is unscrewed counter clockwise, by hand, then removing the bottom shroud by removing the barrel bushing/vent nut. Then you can easily enlarge the existing vent holes at the rear of the Edgun shroud with a variable speed hand drill. I made my lower shroud vent holes 2.0mm in diameter:

You can go larger if you wish. If you go too large and begin to hear air “whoosh” out of the vent holes when firing, just wrap some felt around the inside of the shroud, behind the vent holes, to slow the air down. You can touch them up with the tip of a permanent ink black felt tip Sharpie. This is how they look when done, but before the Sharpie touchup:

The next step is to increase the air flow from the front of the Edgun to the rear of the shroud. Now on the R3 this is a bit more complicated because the shroud comes in two parts, so I will concentrate on the R3. Unscrew the top shroud, baffle cover, taking care to remove it easily because the O-ring can be damaged on the threads. Be sure to put silicone grease that O-ring before putting it back on. Note the bottom shroud, and barrel, are held in place by a 19mm nut with vent holes in it. It unscrews easily, counter-clockwise, with a common metric wrench:

After it is taken off, you then enlarge the holes in the nut with a variable speed drill. I went 2.5mm, you may choose to go smaller, but not much larger, as the hole diameter affects the strength of the nut.


After this is done, you simply replace the bottom shroud, then the barrel bushing, being certain that the bottom of the shroud is properly placed OVER the rim of the permanent cone shaped breech attachment. If you ignore this step, you will bend the bottom of the shroud when you tighten the nut…note the bottom of the shroud sitting flush against the cone shaped breech attachment in this picture. The hidden rim inside the shroud is about 1/8″ or so tall, but it must have the shroud placed evenly over it before tightening the nut. When you lift up and remove the bottom shroud, you will easily spot it, as the cone shaped breech attachment remains in place:
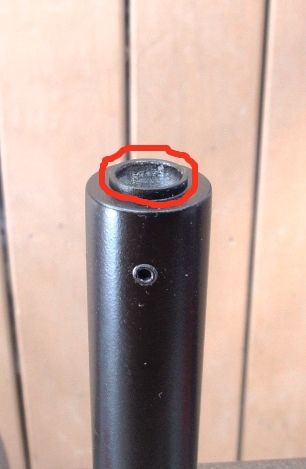
Finally, there has been much discussion regarding how much torque must be used to tighten the nut that holds the barrel and bottom shroud in place. This is not a difficult process. First you obtain a Russian Torque Wrench…see below picture:

Placing the 19mm wrench in this handy grasping tool, you tighten the nut to where it is snug against the shroud, then you go roughly 1/2 turn further. That’s all it takes. Remember, this is thin and fairly soft aluminum and will strip threads or bend rather easily. AND…if you have placed the bottom of the barrel shroud over the lip of the cone shaped breech attachment, you will not have bent, or dented, the bottom of the shroud.
Replacing the top shroud (baffle cover) is easily done, just be careful sliding the cover over the O-ring using a light downward pressure and clockwise screwing motion until it gets past the threads on the cover. Snug it up hand tight, no more.
That’s it! You can expect at least a 50% reduction in muzzle blast, which on the Long Edgun makes the hammer slap the loudest noise emitted when shooting the gun. It costs nothing, takes about 1/2 hour, a couple of metric bits, and a variable speed hand drill. Take your time. The existing holes will guide the bit if you proceed slowly, especially when starting the new hole.
Now, for that hammer slap…I’m still working on that one.
Regards,
Kindly ‘Ol Uncle H 😯 😯 t
All Replies


- You must be logged in to reply to this topic.
I have watched the video many times and did so before I even said I would make a prototype, tension on the barrel does not hold the barrel against the front of the breach block, the tension holds the shroud on and helps keep everything aligned. The barrel does not even touch the front part of the block it has a rubber o-ring there to allow it to float, the shroud I made for Horace removed the O-ring and was a tight fit holding the barrel and shroud in perfect alignment. There is no need for tension on the barrel, the barrel is strong enough to stay straight, all it needs is to be held in place so it can not move and that is accomplished quite simply, it will not go anywhere with the shrouds I have made. Just because a design is made a certain way does not always mean that is the only way it can be made. I have been working in design and technology just about all my working life and I can see what is needed to make something for this gun. Feel free to believe what you want, just because a maker says something is so does not make it the only way it can be done. I have a great respect for the maker of these guns, they are awesome air guns, but sometimes improvements can be made and simplicity introduced.