


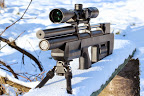
My EdGun Matador R3M 22 cal
I received my Matador (01/05/2014) in absolutely perfect condition and in 3 days ! 
I enjoyed talking to Tony R, he is easy to joke around with so much so I forgot to order some extra Brass rings ! 😳


2+3 extra mags, 2 valve stems and an extra fill probe.


I fill to 220 bar and shot down to 110 bar using JSB 18g, here the out of box chrony results with a 920 fps average.

I refilled to 200 bar and got 50 good shots down to 120 bar.
I haven’t cleaned the barrel yet, 5 shot group at 50 yards with little wind.

5 shot group 75 yards with little wind.

At rest on my chrony/work bench, I can’t wait for this weekend hopping it doesn’t rain !!

Thanks for l@@king !
~ Greg
All Replies


Wow thanks Greg. Do you have a photo of the twisted frame? I’m not doubting you I just have my reasons why I want to see it for myself. Thanks for your help
No Sir,
The frame that supports the scope rail that was twisted from the factory torqueing.
With the frame and barrel block secured in a padded vise the frame twisted CW with the frame while tightening the nut.
The twist in the frame wasn’t permanent, de-tensioning the frame made it go back straight.
With the lube it help to prevent it from twisting the entire frame and slips right at the nut base instead.
This is a quick top view drawing of what I mean, it’s an over exaggeration of 4 MOA.

~ Greg
Greg, you’re talking about the barrel block that twists in the rear of the action? I have had the same thing happen when I installed the offset moderator.
Awhile ago I found another thing with my Edgun ………
When removing and installing the LDC the nut was installed at a high torque setting it was hard to remove with no lube on it, very dry.
I placed it in a vise padded on both sides with hard wood to protect the finish like Ed did in his video.
Got the nut off and install the LDC and when to test shoot.
The POI changed and it was shooting 4 MOA lower and 3-4 MOA to the right.
I removed and optically re-centered my scope and remounted it.
It was now shooting straighter, only 2 MOA off to the left instead of 3-4 before the LDC switch.
What I can to realized is that the factory torqueing of the nut had caused the frame to twist Clockwise with the nut.
This caused the frame to twist off it’s plane with the scope rail, and this needs to be in parallel alignment with each other.
So I removed the nut and Moly lubed the treads and it’s end that make contact to the bushing.
Test shoot and it was better but still shooting left about 1 MOA so I slip off the LDC cover and turn the nut Counterclockwise just a tad.
Now, it’s spot on ….. … . .
~ Greg
Thanks Larry I appreciate all that !!
Did you notice that the trigger adjustment screw is less sensitive also.
Before the mod just a 1/8 turn would change dramatically and gained an ounce of pull weight instantly.
With the mod it take more turning to get an ounce of change about 1/2 – 3/4 turn now and dialing in a faction is easier to acquire.
The mod made the adjustment screw angled forward, thus taking more lengthening to elongate its travel. 😀
If Ed would angle the adjustment screw forward then it wouldn’t push the actuator lever upwards when engaging the first stage pull, then no need for my mod.

Before the mod this is the geometry of the trigger assembly.
As you squeeze of the first stage it lifts the actuator lever upwards and actually sets a bit of the trigger sear engagement off as well.
With my mod it makes the peck contact point on the adjustment screw go forwards thus bypassing its highest contact point on the actuator lever.

When removing the Trigger assembly DO NOT dry fire, it will/can break the hammer springs guide rod !
~ Greg

For those Edgun owners looking for a lighter, crisper trigger give GKU’s trigger modification a go. I did this mod a few days ago and i’m amazed at the difference it has made. Thanks Greg for sharing, keep em coming!!
Regards
LarryW 🙄
I ordered the New Offset LDC, some extra mags and brass O-rings from Tony I received today.
When ordering since they seem to be caliber specific you need to let Tony know what caliber you will be needing it for.
Yah, I just needed to compare it to the one I designed and made with the help of my machinist friend.


Compared to my FatBoy LDC it a bit longer by 1/2″ and with a much slimmer can.


10mm hex wrench cut down to 32mm for clearance into LDC.

But, I’m not all that sure when I’ll be able to install it onto my Matador for comparison testing ………. I’ve been very busy with the wife/life :biggrinn:
Merry Christmas to all !!
~ Greg
Regards
LarryW 🙄
Yes, but my wife borrowed my camera, so sorry no pics.
Also, I didn’t think anyone responded so I thought it wound be redundant to posts it.
I use a PVC cap that I machined to fit the AT and added a O-ring/groove and drilled 2 small holes on the off set diameter.
I pushed it with the cup side facing down all the way in till it made contact with the reg.
~ Greg
Greg, great tip on the mags!! Did you do any mod to quiet the ping of your AT, after hanging that awesome CAN??
Regards
LarryW 🙄
No, there the old style aluminum ones.
I would think that the new plastic one will have less of a chance to do any added damage/alteration to the pellets.
But there are some tuff high tech plastics out there so I won’t know for sure until I get some in for my R3M to tryout.
Also, on the chambers the I didn’t alter with a chamfer they were some that where actually clean looking with no burrs.
I’m watching and keeping track to see if they will give me fliers in the near future.
I have a theory that it will, because of the 90 degree leading forward edge on the inside O-ring cutout is sharp enough to cut.
I’ll be posting any occurrence here if any.
~ Greg

Greg, are your mags plastic ones?
Nice work!
Greg, great tip thanks so much for sharing your findings…
I have been noticing some repeated fliers with some of my magazines.
When test shooting and breaking in the R3M I’ve been ejecting the mag when fliers occurred and marking each pellet camber with a black Sharpie (It’s hard to see circled in red).

Reloaded each mag and I shot to verify and the fliers reoccurred in the same marked chambers.

I loaded the mags and manually pushed the pellets thought and they did get cut/scratched off a bit of lead on the way out.
I removed the O-rings and inspected the pellet chambers and they were burrs left behind from the milling process.

With an Exacto knife with a new blade installed, I chamfered the edges but only to the chambers that gave me trouble. There is no reason to even chamfer the edges that looks bad, if they didn’t cause an issue. If it ain’t broke don’t fix it !

These are all 1 mag = 10 shot groups at 50 yards with JSB 18g @ 920 fps.
My R3M is filled to 200 bars and shot down to 115 bars I’m getting 50 shots.
This pic show the results as I tweaked each mag, notice how they improved and tightened up the groups with each mod stages on the way down.

I started in the early morning and by lunchtime the wind started up, so more testing on mags 1, 2 and 3 later.
More shooting is needed to recheck the mag tune as the gun break in even further.
I didn’t remove the black Sharpie marks as a future reference in case other flyer occurs in the same chamber or not, I’ll know.
So, the next time you get a flier yank that mag out to mark that chamber !
~ Greg
- You must be logged in to reply to this topic.
Sorry no pictures, but even though I had it would be very hard to tell and see such a small angle.
Not saying all Matador R3Ms will have this twisting.
But there is a easy way to check.
Have a far zero-in let say 100 yards, then shoot at a very close distance of 8 yards or so.
If your close POI is a bit off to the right, I’d suspect it’s twisted CW.
~ Greg